I never thought I would say this, but I actually think the more you clean, the more you actually want to clean. It is addicting to look at the immediate results of your hard work. You see the sparkling surfaces, smell the freshly scented air, and your whole life starts to look a little crisper and clearer. So I want to keep that feeling going by adding more cleanliness and purity to my life.

So when I went to sleep the other day and took a deep contented breath, I was more than a little grossed out my a not-so-fresh hitting my nose. You’re welcome for that overshare.

Feeling empowered and invigorating by all the new cleaning products and tips I have been trying this spring, I took that momentum and used it to tackle my pillows. So on an oddly snowy Sunday this past weekend, my feather pillows got a bath in the washer.

How to Clean Feather Pillows | www.rappsodyinrooms.com

How to Clean Feather Pillows

1. Grab your feather pillows – whether sleeping or inserts. We are just talking feather pillows now because cotton and other fills are different to clean.
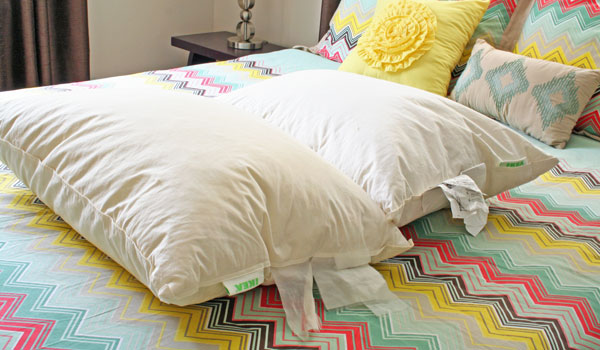
How to Clean Feather Pillows | www.rappsodyinrooms.com

2. Wash two pillows at a time to balance the washer. Make sure to use the hand wash or delicate setting. I also recommend using my no-grate laundry detergent to give a nice fresh scent.
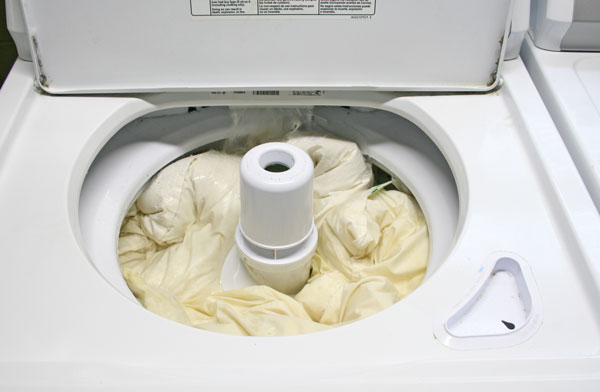
How to Clean Feather Pillows | www.rappsodyinrooms.com

How to Clean Feather Pillows | www.rappsodyinrooms.com

3. After the wash cycle toss them into the dryer on your hottest setting with a tennis ball, clean tennis shoes, or dryer hedge hogs (affiliate link) like me! In the beginning I liked to fluff them every 15 minutes and just make sure they were doing okay.

How to Clean Feather Pillows | www.rappsodyinrooms.com

How to Clean Feather Pillows | www.rappsodyinrooms.com

Tip: These will take a long time to dry. For a more eco-friendly approach give them a short cycle in the dryer to allow them to fluff (it is essential to break up the clumps of wet feathers). Then, put them outside in a porch or covered area on a really hot day to lessen dryer time. These take a long time to dry – start them at the beginning of the day!

I was really curious on how these pillows would turn out. For some reason I was dubious if this would work. I am thrilled with how clean, fresh, and fluffy these came out of the dryer. So fluffy. I actually have a Despicable Me unicorn moment (“It’s so FLUFFY!!”)

How to Clean Feather Pillows | www.rappsodyinrooms.com

Now I can breath deep before I go to bed and not be kind of grossed out by my interesting smelling pillows. Don’t worry guests, your pillows are freshly laundered as well. 🙂

PS – Don’t forget to set those DVRs local Lynchburg and Roanoke residents! I’m on WSLS Channel 10 at noon today on Daytime Blue Ridge. Spoiler: we’re talking more cleaning!

  • Aren’t fresh and clean pillows wonderful? Mine aren’t feather or down but they wash beautifully using the technique you described. I like putting them in a hot dryer to kill any creepy crawlings that might still be there post washing.

    I hope your tv segment went well!ReplyCancel

    • Thanks so much Paula! Good to know that other types of pillows wash well this way. They are so nice and fresh now! And the tv segment was really good!ReplyCancel

  • Katie

    Great tips…everyone cleans their sheets but I can only imagine how wonderfully I’ll sleep on fresh clean pillows! I’m going to try this this weekend! Where did you find your cute dryer hedge hogs?!ReplyCancel

  • durandconnie

    I’m going to try this! We tried 3X now and always end up with a ‘sour’ smell at the end. This is my husband’s favorite pillow so he wants to try again to get it right! Thank you for your post; I will be showing it to him 😀ReplyCancel

    • Oh no! A sour smell would be terrible! I didn’t end up with anything but a fresh smell! But it did take A LOT of dry time too! I hope you can get it not to smell sour!ReplyCancel

  • […] Image Credit: Rappsodyinrooms.com […]ReplyCancel

  • Dan Kidder

    Great tip. I am going to do this tonight. Thanks.
    P.S. I am a Liberty grad living in Utah and do so miss Lynchburg.ReplyCancel

    • So glad to hear that Dan!! And how fun to find another Lynchburgian via the blog. Hope Utah is treating you well!ReplyCancel

  • Could anyone pleaaaaase help me??… what if i dont have the tennis balls or the hedgedogs… how do i do to make them fluffy? 🙁

    I only have 1 feather pillow; you think that will ruin my washing machine… seriously?ReplyCancel

    • I’ve seen people do it with old (clean) tennis shoes. The hedgehogs and tennis balls are just to stop the feathers from clumping while drying. You can buy cheap tennis balls at the dollar store if that helps!

      I’m not exactly sure about the washing machine question. I’ve only cleaned two at a time. Perhaps you can put something else in there to balance it out. A sweatshirt? Coat? Something heavier that you won’t mind getting a few feathers on?

      Hope that helps!ReplyCancel

  • Lori

    I tried this with 2 feather pillows, they floated in washer, too bouyant to get washed. I tried holding them under water to try & get air out but they still just floated. Anyone else have this problem? I just gave up & put them outside after spinning them.They’re still out there waiting to be tossed I guess.ReplyCancel

    • I’m so sorry to hear this Lori. Were they throw pillows? Perhaps smaller pillows aren’t dense enough to absorb water and wash in the washer. Did you try running them through anyways? Maybe the rinse and spin cycles would still have gotten them clean.ReplyCancel

    • Corrine

      Maybe take them to the laundry mat??ReplyCancel

  • Carrie Morris

    I have also washed a Queen sized feather doona and sleeping bags, used the local laundromat’s large sized machines to wash and dry and my Eucalyptus wool wash. I have also washed my latex pillows …………..I’m thinking, I’m admitting to a cleaning
    addiction…….but I do wash most things.ReplyCancel

  • Love this site,thanks for including me.ReplyCancel

  • Corrine

    HAHA!!!! My husband says I’m not happy unless the washer is running….If it stands still long enough, I will wash it….
    I just got my Queen size featherbed back from dry cleaners, I’m debating on taking it to laundry mat next time 🙂
    Thanks for the info, as I do have feather pillows, too. I also have a front loader washing machine, so I don’t think they will “float.”ReplyCancel

    • Haha! That’s so funny!! I would definitely try the laundry mat to wash your featherbed next time. Save some money!ReplyCancel

  • Melinda

    This is how we wash and dry our feather pillows too. I love when the pillow is soooo fluffy and has a good smell again. Greetings from Denmark/Hungary 😉ReplyCancel

    • I totally agree! There is nothing better then fluffy, good smelling pillows!! Thanks for commenting from way over there! 🙂ReplyCancel

  • deb

    Well, last time I tried throwing a feather pillow in dryer I got a nasty burning smell so folks be leary of putting your pillows in on high.ReplyCancel

  • Linda

    my feather pillows are old, but new ones are expensive and too overstuffed. My poor old pillows fit me so perfectly! Anyway, any suggestions to actually keep the feathers in the pillows? The dryer ends up full of feathers?ReplyCancel

    • Hmm, I’m actually not too sure about that one. I didn’t lose too many feathers when I washed mine. Are you using the delicate cycles on them?ReplyCancel

      • Sharon Pikul

        Simply go to your local fabric store. You can get pillow ticking or zipper pillow covers. Stick the pillows into the zipper pillow or stitch the pillow ticking around your pillows. Sound like they are ready for a new covering.

        I even stuck two old pillows together into a new pillow ticking and made a really nice one.ReplyCancel

        • Sharon Pikul

          Also, try using a front loader and not a top loader washer. It really washes them much better and you don’t have to worry about them floating.ReplyCancel

          • Definitely! I don’t have a front loader so that would have been a trip to the laundry mat for me.

        • Thanks for the great idea!ReplyCancel

  • Kaden Joy

    I didn’t even know you could actually wash feather pillows. ThanksReplyCancel

  • Kathy

    This is definitely something to do in the late spring/summer. While I wash my pillows on gentle I spin them out on the regular or white cycle. The key is to extract as much water as possible. I will even take the pillows out of the washer, fluff up and respin again to get out even more water. I dry on medium because high will burn/ melt the feathers/down and I use the dryer buddies. I also fluff the pillows every 15-20 minutes. Down/feathers take hours to dry and never do completely in the dryer. I clip mine to a hanger and hand in direct sunlight in the summer, too much pollen in the spring. I fluff throughout the day to move the down/feathers around. It may take a few days to dry completely, but you want to make sure it’s completely dry so it won’t mildew. I then throw it back in the dryer on the air fluff cycle to suck out any pollen we might have picked up because I have bad allergies. I then put in a pillow protecter before I put it in the pillowcase. The protector can be washed often and your pillow spayed with febreeze and air fluffed in the dryer or on the line. I refresh the pillow each time I wash the protector by throwing it in the dryer or hanging it outside.This insures a really fresh pillow without the allergens or yellowed cover. You’ll only need to wash your pillow about once a year or so if you follow the above hints.ReplyCancel

    • Awesome! Thank you so much for all of your great tips and information!ReplyCancel

  • Carrie Morris

    I also place my pillows in the freezer for 24 hours to kill any dust mites, also grandsons fluffy toys as he suffers with asthma.
    I usually give then a good shake or cool/warm tumble dry, then out on the line on a good sunny autumn or winter day. Lucky we live in Queensland Australia most days are sunny even in winter.ReplyCancel

    • Cool! I have never heard of placing the pillows in the freezer! Great tip!ReplyCancel

Remember earlier this week when I showed you how to make a foam board cornice (and it was beautiful) but I took it down due to it blocking natural light in the living room? Well now I’m back with the Plan B I alluded that makes me SO happy. Like twirl in a circle and clap my hands happy every time I walk into the living room.

Plus, I’m showing you how I made a 10 foot curtain rod with electrical conduit for about $10!

How to make a curtain rod from an electrical conduit | www.rappsodyinrooms.com

Let’s back up to the evolution of the living room curtain situation.

How to make a curtain rod from an electrical conduit | www.rappsodyinrooms.com

We decided to welcome the natural light as much as possible by flanking the window with curtains that add softness and dimension to the room without fighting the color and pattern of the rug. I think it makes a HUGE difference to the room. [We bought this gorgeous set on H&M for $25 for the pair! But I just went to look for them and I couldn’t find them online. Sad day!]

How to Make a 10 Foot Curtain Rod Using Electrical Conduit

Materials

  • 1/2 inch electrical conduit pipe ($2.44)
  • 3 two and a half inch corner braces ($3.27)
  • 3 half inch one hole strap ($0.64)
  • Nuts and Bolts that fit both the brace and strap holes ($1.18)
  • Screws for securing the brackets to the wall (already had)
  • Spray Paint (I used Design Masters 24 Karat Gold – $3.50)

How to make a curtain rod fron an electrical conduit | www.rappsodyinrooms.com

Instructions

1.Determine the size of the curtain rod that you want. I personally did not cut it because my window was so big. All you have to do is use a hack saw to cut the pipe easily.

How to make a curtain rod fron an electrical conduit | www.rappsodyinrooms.com

Tip: Wrap a piece of painters tape where you are going to cut to get a nice clean edge.

2. Clean the pipe to prep for painting. I used isopropyl alcohol.

How to make a curtain rod fron an electrical conduit | www.rappsodyinrooms.com

3. Spray paint the pipes and all the other pieces, even the screws.

How to make a curtain rod from an electrical conduit | www.rappsodyinrooms.com

4. When dry, secure the braces to the wall. This is what your bracket should look like on the wall (except all one color!).

How to make a curtain rod from an electrical conduit | www.rappsodyinrooms.com

Tip: Remember to hang curtains high to give the illusion of a bigger room.

5. Just pop in the rod and you’re done! Now, let’s just get some more eye candy in shall we?

How to make a curtain rod from an electrical conduit | www.rappsodyinrooms.com

Now, let

How to make a curtain rod from an electrical conduit | www.rappsodyinrooms.comHow to make a curtain rod from an electrical conduit | www.rappsodyinrooms.com

How to make a curtain rod from an electrical conduit | www.rappsodyinrooms.com

How to make a curtain rod from an electrical conduit | www.rappsodyinrooms.com

How to make a curtain rod from an electrical conduit | www.rappsodyinrooms.com

PS – I’ll be on Daytime Blue Ridge again this Friday, March 21st at noon to share my homemade spring cleaning products using only four ingredients! You can watch my last segment to get a sense of what it is all about!

Sharing This Here:

  • You are so smart to come up with your own way to make a curtain rod!

    While reading an article in HGTV Magazine the other night, I was shocked at the price of curtain rods. My living room has four windows and if I were to add rods, it would cost nearly $200!ReplyCancel

    • Whoa! That is a lot of money for curtain rods! Crazy! I’m such a fan of the conduit rods now! Thanks Paula!ReplyCancel

The following is a tutorial on how to make a foam board cornice. It’s a good tutorial and will work for most windows. However, this is also the tale of how my trial and error of making a foam board cornice made us realize that we did not like a cornice (or valance or anything above the window) for the living room.

How to Make a Foam Board Cornice | www.rappsodyinrooms.com

Let’s start with the before.

Decorating with a Spouse - Our Rug Story | www.rappsodyinrooms.com

decorating-with-a-spouse-living-room-05

This is a curtain that my wonderful mother-in-law made. We picked out the fabric together and she sewed a beauty. However, my style changed, and therefore I wanted the curtain to change.

One weekend Eric and I took a road trip to Charlottesville and hit up the local U-Fab there. We found a gorgeous textured grey fabric that we wanted to use for making a foam board cornice.

One snow day a few weeks ago I set out to make one. Here is what I did.

Foam Board Cornice Tutorial

Materials Needed:

  • Foam Board (the width of your window)
  • Exacto Knife
  • Duct Tape or Spray Adhesive
  • Batting
  • Fabric
  • Picture Hanging Claws or Hooks and Nails
  • Measuring Tape / Yardstick

How to Make a Foam Board Cornice | www.rappsodyinrooms.com

Instructions

1. Measure the length of your window and add a foot to that. This is the length your cornice will be, including the side pieces (at 6 inches for each side). Buy the appropriate amount of foam board you will need (I found mine at the Dollar Tree and needed 5).

How to Make a Foam Board Cornice | www.rappsodyinrooms.com

2. Figure out the width that you want the cornice to be. Cut out the length and width of foam board. I used an exacto knife and it cut like butter. Duct tape all the pieces together (if needed).

How to Make a Foam Board Cornice | www.rappsodyinrooms.com

3. Make the corners of your cornice by carefully cutting in 6 inches on each side. Don’t cut the whole way through! Just cut enough to be able to bend it backward. I put a piece of duct tape on the back of the cut to reinforce it. You now have the frame of your cornice board.

How to Make a Foam Board Cornice | www.rappsodyinrooms.com

How to Make a Foam Board Cornice | www.rappsodyinrooms.com

4. Wrap a thin batting around the foam board frame. You can also just adhere it to the front with spray adhesive. Use duct tape or hot glue to adhere it to foam board. [Yes, mine looks very weird. It is because I used an old mattress pad that works just like batting. It looks colorful because it was used as a paint drop cloth prior to being batting for this project.]

How to Make a Foam Board Cornice | www.rappsodyinrooms.com

5. Next, wrap the fabric around the batting. Adhere it to the foam board with adhesive or duct tape.

How to Make a Foam Board Cornice | www.rappsodyinrooms.com

How to Make a Foam Board Cornice | www.rappsodyinrooms.com

6. Hanging! The best way is to connect picture hanging hooks/claws and nails. Just glue the picture hanging hook/claw to the edges of the foam board.


How to Make a Foam Board Cornice | www.rappsodyinrooms.com

How to Make a Foam Board Cornice | www.rappsodyinrooms.com


How to Make a Foam Board Cornice | www.rappsodyinrooms.com

How to Make a Foam Board Cornice | www.rappsodyinrooms.com

As I was playing around with different ways to hang this I had it up and down. When it was up I thought it was beautiful and a great solution for a light weight cornice. However, when it was down for a while, Eric and I realized that we LOVED not having anything above the window (no matter how pretty it was). The living room is a darker room in the house and we embrace any natural light we can get. Even having a cornice slightly covering the window cut down on the natural light. So we decided to scrap this plan entirely. Wha whaaa.

It made for a good tutorial right?! I’m still glad I tried it!

Also, here are some other great sites where I gleaned information for doing this project:

Now we are on to Plan B to keep the natural light but offer some sort of window adornment and softness. I guess it just goes to show that decorating really is a trial and error sort of process with even the best laid plans. I still do encourage you to make a foam board cornice though! They are great and so easy to make (inexpensive too, depending on the fabric you choose).

Sharing This Post:

  • You make this project look so easy! With a good fabric price, one could update a room with several windows on a budget. Do you have a place that you can keep your cornice in case you change your mind about leaving it off of your windows?ReplyCancel

    • It is easy Paula! Gotta love the possibilities of Dollar Tree foam board! Alas, this cornice has already been repurposed…yikes! I’m hoping to use the fabric somewhere else shortly!ReplyCancel

  • Darlene Harris

    Thanks for the info I had been wondering if this was possible.ReplyCancel

  • Megan this looks GREAT!!! ~BethReplyCancel

  • That is a fabulous DIY!!! Wow, I am totally impressed! Great job!!

    NancyReplyCancel

  • Carol Bader

    I love this…i am going to do in my daughters room. I am unclear how to put on wall though. I am not very good with this…but willing to learn :). Thanks!ReplyCancel

    • Hi Carol! I’m so glad you are going to do this! I think the best way to hang them is to glue the picture hangers with the triangle on it to the foam board. Then you can just put a nail on the wall and hook it on that. Or you can also put a top on the cornice and put it over a curtain rod. Let me know if you have any more questions!ReplyCancel

  • Becky

    Great idea. I was wondering, when wrapping batting and material around board, how about the 6″ on both sides that bend for the sides. It seems the batting and material would keep it from bending like it should. Please share how that works.ReplyCancel

    • Hi Becky! It is still able to bend. However, if you would like to make it crisper you could always use separate pieces for the front and sides so the fabric isn’t actually bending around the corner. Or put the piece on all sides and then just cut a slit in the batting to help it bend easier. Hope this helps!ReplyCancel

  • Lynda Barker

    Foam board is great for smaller windows. Try using foam insulation if you need a wider span. Foam board is available in lots of widths and thicknesses. WORKS GREAT!ReplyCancel

  • Cleopatra Dean

    Do you know where I could purchase the kit. They used to sell them at home depot. Thank youReplyCancel

    • The foam board cornice kit? I didn’t know they made one actually. It sounds neat though!ReplyCancel

    • Renee Whitehead

      Joanns Fabric stores carry the cornice board kits.ReplyCancel

  • ALETA

    You say put the picture hanging claws on the edges..you mean all around? How do you attach when it it is away from the wall the whole length.?ReplyCancel

    • I mean on the edges that attach to the wall on the sides. That does sound confusing! Sorry about that!ReplyCancel

  • Karen

    It’s a great idea though I was looking for something else but I’ll do that instead of the thing I was planning. I still wonder how we can fold it without putting scotch tape.ReplyCancel

    • Thank you Karen! As for folding it without the tape, you can! When you make your corner cuts don’t cut through the paper on one side. This will allow you to fold it but still have it connected. I just added tape to reinforce but it’s probably unnecessary.ReplyCancel

  • Angela

    Hi Megan,

    I love your project! I really want to try this with my recently installed windows. I’m just a little confused about how to “hang” the cornice. I’m not sure what the “picture hooks/claws” look like. Can you maybe direct me to a place to find these or perhaps a photo? By the way your finished product looks fantastic!

    Thanks,
    AngelaReplyCancel

  • Liz

    Did you need to anchor to wall in the center because it is so long? It doesn’t sag in the middle?ReplyCancel

    • Mine doesn’t sag because I have it against an old, wide curtain rod. It was already on the window so I thought I might as well use it!ReplyCancel

  • jaime fulmer

    I love this project, thanks for the info. Can I ask you another question. ..I love your rug where were you able to find that at?ReplyCancel

    • Thank you! I got the rug on Overstock! Good luck with the project!ReplyCancel

  • Lisa Kelly

    I use toothpicks and soray gkue to attach the sides and a top piece. I do tape over the corners but ptobably not needed.ReplyCancel

  • Linda

    Thank you so much! I have a very long window in my livingroom that I want a cornice for and wood would be too heavy. I never thought of foam board from the dollar store. How clever you are! I am going too start measuring and planning since now I can get my head around it. Thank you for sharing! 🙂ReplyCancel

  • Anne Vander Molen

    You may have liked it better if you had mounted it up at the ceiling. It would have made the ceiling feel higher and covered less of your window. That is how I do mine. Any window treatment mounted close to the ceiling makes the room feel higher.ReplyCancel

  • Sara

    Just curious how wide is your window and how high did you make the cornice? I am considering this project for a window that is 70″ wide but I’m afraid it will bow in the middle.ReplyCancel

    • I am actually not sure how wide the window is, but I had an old curtain rod that I left up to help it from bowing. For a 70″ wide window I would think it probably would bow so you may need some extra support. The cornice was between 12″-18″ wide hing right at the top of my window.ReplyCancel

  • Thank you for posting a creative tutorial. I have a question in regards to your paint colors!. I’ve painted my room three times and still not correct shade of red. Can you still remember what color red and white and brand?
    Your room looks fantastic and friendly.ReplyCancel

Ok, here it comes. I’m already hearing the hippy jokes and the cheap skate jabs. But I’ll take them. Nay, I’ll embrace them. Because here I am completely hooked on homemade household cleaners.

It all started when I realized how easy homemade cleaners are when I made all your basic cleaners with just four ingredients.

Money savers and cleaning perfection.

I wanted more! But for less. Are you with me?! It’s what we all want.

I’ve moved onto a homemade laundry detergent. Why laundry detergent? Well it all came down to the simple fact that I was almost out. So I thought why not give it a shot?

As I started researching recipes I almost bailed. The goal here is to make cleaning easier, while still effective, and save some money along the way. However, when I repeatedly saw soap grating and slaving over stove to make it, I was out. Then I stumbled across this oh-so simple recipe on One Good Thing by Jillee.

How to Make No Grate Homemade Laundry Detergent | www.rappsodyinrooms.com #cleaning #homemade #laundrydetergent

It was only three ingredients (plus water), pennies a gallon, and no grating or cooking required.

No Grate Laundry Detergent

How to Make No Grate Homemade Laundry Detergent | www.rappsodyinrooms.com #cleaning #homemade #laundrydetergent

1) Pour the three ingredients into a gallon container (I used a thoroughly cleaned milk jug).

How to Make No Grate Homemade Laundry Detergent | www.rappsodyinrooms.com #cleaning #homemade #laundrydetergentHow to Make No Grate Homemade Laundry Detergent | www.rappsodyinrooms.com #cleaning #homemade #laundrydetergent

2) Pour 4 cups of boiling water into the container and swirl until dissolved.

How to Make No Grate Homemade Laundry Detergent | www.rappsodyinrooms.com #cleaning #homemade #laundrydetergent

3)Let cool and then fill container with cold water. Make sure to fill the container up to the top with water – not just suds. Let the suds run over while filling. You will still have plenty of soap inside.

How to Make No Grate Homemade Laundry Detergent | www.rappsodyinrooms.com #cleaning #homemade #laundrydetergent

A Glitter Precaution: Dawn is recommended since it cuts grease. However, it is such a cut-to-the core cleaner that I am choosing to not use this detergent on my fancy shirts with sequins or glitter in case it  could strip it. It would probably be fine but I just have some blingy shirts that I love so much that I was wash them very carefully.

Use about 1/2 cup to 1 cup per wash. Yes, it seems like a lot but it is a thinner detergent. However, it uses so little ingredients and is so easy to make, I don’t find that to be a deal breaker. I will probably end up making a couple of gallons at a time just to be more efficient. Still, those boxes and bottle of ingredients I bought will probably last me years! Take that $8 store bought detergent.

The result is still super fresh clothes that are very clean. I can’t tell a difference whatsoever in my clothes cleaned with my homemade detergent opposed to a store bought detergent.

I’d love for you to try it and tell me what you think! Are you as hooked on these homemade cleaners as I am? Why didn’t I know it was so easy before!?

Amazon affiliate links are included in this post.

  • I’ve been toying with the idea of making homemade cleaners for economical reasons (definitely!), but I’ve been a little scared they wouldn’t get my clothes as clean. I like fresh laundry, like all of us! 🙂 Glad to know this one is effective . . . bookmarking for when I feel brave!ReplyCancel

    • Go for it Meg! I bet you’ll never look back. I was so leery of any and all DIY cleaners. It just seemed like so much work and they probably weren’t going to clean well. But I eased into making them and I am hooked. They are easy, inexpensive, and I’m finding them even more effective than store bought ones. I’m a huge advocate right now! So think of me as your personal cheer squad encouraging you to make that detergent! 🙂ReplyCancel

      • ive been making my own laundry detergent for 3-4 years it’s much better than what you can buy.
        Also you can buy downy or any other softner. And put it in a bowl add some wTer a few sponges cut up squeeze them before throwing them in the dryer and your clothes will smell fresh every time. Or add a few drops at a time of essential oil of your choice to your laundry detergent.ReplyCancel

        • That’s so awesome Nita! And I definitely want to try the sponges for the dryer! I’ve been waiting until I’ve used up my dryer sheets to give it a try. It sounds marvelous! Thanks for the great ideas!ReplyCancel

          • Susan davis

            Hey! I’ve been making my powder laundry soap for awhile now. But I think I’m gonna try the liquid next time. And I have used the sponges with fabric softner also. Just recently I used a box of dryer sheets and my clothes caught on fire! Actual full flame fire after bringing them home from laundry mat. All I seen was the dryer sheets so I read the box . Idk if it’s all dryer sheets. But read ur box for warnings . Mine said not intended for children’s clothing Bc it makes the non FLAMEABLE FLAMEABLE!!!! Really!!!! I was surprised. I’ll never use dryer sheets again

          • WHOA! Fire?!?! That’s terrible!! I’m so sorry to hear that! But I have really been wanting to try the sponges with fabric softener. I was going to start once I ran out of dryer sheets but maybe I will just throw them out. Yikes!

            I highly recommend the liquid detergent. I only wash my clothes in cold water so I have to use liquid since powder doesn’t dissolve as nicely in cold water.

          • Trina

            Just be sure to squeeze the sponges out completely and do 1 part softener to 2-3 parts water. Otherwise it will leave stains on your clothes!

          • Great tip! Thank you!

  • Dianne Holland

    I love this idea, especially since I can no longer grate my soap–however, can this be used in the HE front load washers?ReplyCancel

    • I do not have a HE washer so I cannot speak from my own personal experience but from what I have read this detergent works well in HE front load washers. It is low suds and many people have had good experiences using it in their HE washers. I’d love for you share how it works for you if you try it in your HE washer!ReplyCancel

  • Kristen

    Have you noticed if the color/quality of your clothing fabric is the same? My fear in making my own detergent is that it will fade my clothes or that it will make my clothes feel different. What about your delicates? I’m interested in trying this out, so thanks!!!ReplyCancel

    • My clothing still looks great! Although I’ve never really had a problem with fading colors with any type of detergent (except blacks – they fade always). I would probably attest my clothes looking good for years and years is carefully taking care of them and honestly, only washing when they are dirty. That doesn’t mean I wash it after every wear.

      My delicates are fine as well. The one thing I haven’t tried are shirts with a lot of adornments – like sequins, glitter, etc. I am very careful with those and didn’t want to chance washing them in it. I usually just hand wash a few things that I am particular about using bar soap.

      I recommend giving it a shot! If you do let me know how it goes!ReplyCancel

      • Janille

        If you throw some vinegar in with your black clothing the first time you wash it, it’ll save it from fading. I work at a restaurant that wears all black, and this is what we do. 🙂ReplyCancel

        • Nice! Thanks for that tip Janille! I’ll have to try it!ReplyCancel

        • Kathy

          Also a little vinegar in regular laundry washes out sweat smells and stains! My Son in Law works in a kitchen and sweats badly and even after washing his clothes my daughter would complain that they still stank so I told her to put 1/2 cup white vinegar in the wash with her detergent and she said they smell like clothes again and not a gym bag!ReplyCancel

          • I love the idea of adding vinegar. Thank you so much for the suggestion Kathy! I’m definitely going to give it a try.

          • Tami

            It also works on urine smells!

          • Good to know! Thank you!

      • Kathryn hartley

        Also turn black clothing and sock inside out to wash . It does help with fading too!ReplyCancel

  • This recipe for laundry detergent is so easy to make and I’m sure saves you tons of money in the long run. Once I use my stockpile of detergent, I’ll try it.ReplyCancel

    • That’s exactly what I did Paula! I was almost out so I just took the plunge. My guess is that I may be able to save anywhere from $50 – $100 over the life span of the ingredients that I bought!ReplyCancel

  • Rachel

    Do you think this is cloth diaper safe?ReplyCancel

    • Being a child and diaper free home at this point in my life, I am no authority. However, in doing research it seems like quite a few people have used this recipe on their cloth diapers and it worked great. One even said sometimes she needed to strip diapers after a lot of usage and they recommend Dawn to do that. I also read a precaution that Borax may be too strong for PLU diaper covers. That’s the only bad review I’ve read.

      I’d love for you to let me know if you try it on your cloth diapers and if it works!ReplyCancel

      • felicia

        I have two under 4 used cloth diapers and plan to do the same with our third on the way! dawn is a great degreaser but for delicate clothing such as cloth diapers and glitz n glam we use ivory soap it’s best for us. it degreases, smells great and is gentle enough to wash your pearl jewelry. also you never get any residue when using it.When stripping diapers just boil them in water after a good 1 cup per gallon of water peroxide soak over night as far as the p.u.l diapers if you use proper care and rinse right away there is little stripping to be done but if you have the liquid kind simply soak them over night under the sink once you wash they look good as new and never put them in the dryer it may not ruin the liner right away but every dry brakes it down until it cracks or separates. on pul diaper stripping you should use a 1/2 c to 1 gallon vinegar soak over night unless you have hard water then you should use either a softener or store bought distilled water once every 3 months for sufficient stripping is good it will clean all washing build up as well as strip all ammonia smell that lingersReplyCancel

        • Awesome! Thank you SO much for sharing this great information about cleaning with cloth diapers! I’ve had a lot of people ask but I have no babies here to test with! 🙂ReplyCancel

  • Great idea, thanks for the recipe!
    Blessings,
    CindyReplyCancel

  • Dana Gesick

    Can any type of dawn dish soap be used? I don’t have the blue on hand.ReplyCancel

    • You can definitely try another. I’ve only used the blue Dawn and love how it works. However, it could change how effective it is. I just bought a small blue Dawn bottle for $1 and it will last a long time since you only use 2 T. Let me know how it works if you try another detergent!ReplyCancel

  • Karen

    If you are concerned about using this on cloth diapers use 1/2 cup vinegar to rinse them… Works wonders!ReplyCancel

    • Thanks Karen! I don’t have kids so I couldn’t comment on this question. I appreciate you letting us know!ReplyCancel

  • Georgena Allen

    I have been wanting to try making my own household & also cosmetics products. I am going to try this. I also had a concern about my whites getting cleanl & my colors not fading. Did not realize it could be so easy. Thank you!!ReplyCancel

    • I’m so glad that this is something you are going to try! I’m in love with making my own detergent! Making cosmetics sounds interesting too!ReplyCancel

  • Cheryl

    I’m going to try this as I am almost out of detergent myself – thank you so much for posting it!ReplyCancel

    • I’m so glad Cheryl! I was almost out too the first time I made this – that’s what brought me to making mine too!ReplyCancel

  • bev

    I’ve made this laundry soap for a couple of years and love it! I wait to add the Dawn after the two powders have dissolved and all the water has been added — that way your container doesn’t overflow with suds. I also make it double strength and use 1/4 to 1/2 cup instead of 1/2 to 1 cup per load.ReplyCancel

    • Hi Bev! That’s awesome to hear! I also love your idea about making it more concentrated and adding the Dawn at the end. Thanks!ReplyCancel

  • Lisa Allen

    Does it matter if you use the concentrated Dawn or the regular?ReplyCancel

  • Jan Tjaden

    Can you use this homemade detergent in a cold water wash? ThanksReplyCancel

  • Dana

    Been using this a month now and love it!ReplyCancel

  • Tammy

    Hi, I have a 10 yr old boy who seems to constantly be covered in greasy stains. How does this work on those types of stains?ReplyCancel

    • Hmmm, I haven’t really tried it with grease before so I can’t really tell you. Maybe you can try it and if it doesn’t get it all out try a booster like OxyClean?ReplyCancel

    • Molly

      I use a more natural soap in the detergent due to personal preference. It’s not great on grease. I keep a small bottle of original blue Dawn, not concentrate, and put a dot on any grease. It takes care of it.ReplyCancel

    • Trish

      Blue dawn works great on grease stainsReplyCancel

  • Jan Drake

    Could you add OxyClean to the mix too? One of the “grate” methods used Oxyclean, borax, Washing soda… Oxyclean has Hydrogen peroxide, which acts as a bleach and a disinfectant.ReplyCancel

    • Yep! I’ve heard of many people who use OxyClean with it Jan. I am actually going out to buy some OxyClean this week before my white shorts turned yellow when I was wearing them at an amusement park the other day. I’m hoping they turn white again!ReplyCancel

    • Molly

      OxyClean is only effective when freshly hydrated. That’s why they tell you to only mix up the amount you need. I just add a scoop of Oxy to my kiddos laundry. It does dissolve in warm water best but works in a cold wash. I dissolve it in a cup of warm water for cold washes.ReplyCancel

  • Amanda C

    I have used this recipe for about a year. I love it but I do add a couple tablespoons of dr bronners peppermint soap as well because it smells great!ReplyCancel

    • That’s such a good idea Amanda! That sounds like it smells delicious!ReplyCancel

  • Christina

    Can this be used in front loaded HE machines?ReplyCancel

    • It sure can Christina! I don’t have an HE but many people have used this successfully. It is low sudsing, which I hear is key.ReplyCancel

  • Kim

    I’ve been making my own laundry soap and fabric softener for about 2 yrs. I found a recipe that includes Purex Crystals fabric softener that has great frangrances to choose from. I’m going to try this recipe and add the Purex Crystals to it. I think it will work out great! All in one product!ReplyCancel

    • Ooo Kim that sounds like a great idea! I’ll have to check out those crystals!ReplyCancel

  • Kim Kozak

    That was my question. .. how do you make it smell REALLY good. I’m a huge fan of nicely scented laundry/towels etc…. the crystals sound great I already use them with the laundry detergent I buy. They are a bit pricey, but if my clothes don’t smell good I feel I haven’t done my job cleaning them. Lol. One word of warning with crystals. If you’re using them separately from this soap recipe…DISSOLVE WELL IN MACHINE BEFORE CLOTHES GO IN. I have had items ruined by staining/bleaching marks. Otherwise LOVE the stuff !!!ReplyCancel

    • Great tip on the crystals! Definitely don’t want any staining! I’m definitely going to have to check these out. Thanks Kim!ReplyCancel

    • Michelle Sartain

      the best way to get clothes to smell nice is by adding essential oils to your powder mix then add all. Tea tree oil, lavender, sage, rose, whatever sent you like, but make sure it is %100 essential oil not the synthetic from walmart.
      I hope this helps.ReplyCancel

  • […] Will very little effort whatsoever you can make a batch of highly potent laundry soap that will last you a whole year for as little as $10.  This recipe is now very famous and I’d urge you to try it.  You can find the full recipe right HERE. […]ReplyCancel

  • […] Will very little effort whatsoever you can make a batch of highly potent laundry soap that will last you a whole year for as little as $10.  This recipe is now very famous and I’d urge you to try it.  You can find the full recipe right HERE. […]ReplyCancel

  • Emma ocker

    Should the detergent foam up in the washer like regular detergent does?ReplyCancel

    • It does not because you eliminate the foaming when you put the Dawn in and then fill the gallon container. However, you can put the Dawn in after you fill the container with water and you will get foam. Since I don’t have a high efficiency washer I do this now since foam doesn’t hurt my top loader.ReplyCancel

      • Emma

        Thank you, I used Dr Bronners rose scented soap to keep it more natural and I used it for all my laundry all weekend so far so good! Thank you for sharing. Do you have a homemade dishwasher recipie? ReplyCancel

        • So good to know about Dr. Bronners. I definitely think I’m going to try this. I’m glad you’re liking it!

          I don’t have a dishwasher recipe … but I’m working on it. It seems to be a little trickier to make dishwasher detergent for some reason. If I find a good one I’ll keep you posted!ReplyCancel

          • Emma

            FYI I dont think the Dr Bronners is as effective as the dawn as my whites did not come out clean and still had stains so next time I will try the dawn and see if it works better. Its a shame I would have liked the all natural version! Still very easy and cost effective thanks

          • Thanks for the feedback Emma. That’s good to know!

          • Kelly

            So if I choose to use dr bronners soap I do not have to use the Dawn?

          • Yup! That would be the substitution!

          • Yup! You would be substituting Dr. Bronners for Dawn!

  • Marsha

    I wonder if you didn’t fill the container with the cool water and maybe doubled the recipe you could get a more concentrated liquid and would not use as much in each load. I am thinking it would be more like a concentrated Era detergent. What do you think?ReplyCancel

    • I definitely think that is a possibility Marsha. I have to make more soon and I was going to add double the ingredients but still add the water to them. I think you’re definitely on to something!ReplyCancel

  • marissa

    I have very sensitive skin. I cannot use fragrance or dyes. Do you think the dawn would irritate me? Or maybe it is diluted enough since not a lot goes in. Just wondering.ReplyCancel

    • I’m not sure Marissa. I would think you would be fine if you can wash dishes with it and not be irritated. But I also think that you could substitute a dish detergent that you know doesn’t bother your skin. I don’t think it would change the effectiveness of the recipe.ReplyCancel

  • marissa

    I use ivory dish detergent for my dishes. I wonder if that would work instead of dawn?ReplyCancel

    • I definitely think so! I say go for it Marissa!ReplyCancel

      • musika

        I am allergic to Ivory dish detergent, and when we used to use Dawn I was allergic to that, too. I had to either get someone else to wash the dishes, or, if I washed them myself I mixed baking soda and vinegar, and washed very quickly. This was both tedious and also hard on my skin. Is there any UNSCENTED dishsoap that would work as well?ReplyCancel

        • Oh man, I’m so sorry to hear about your allergies. I would just pick a dish detergent that you know you aren’t allergic to. I know some people have suggested Dr. Bronners. Or Method perhaps?ReplyCancel

  • Susan

    I can’t wait to make this! I tried the one with grated soap and hated it years ago. Where do you get Dr. Bronners?ReplyCancel

    • You’re brave Susan! I couldn’t even think about doing the grated version. It sounds like way too much work. I think Dr. Bronners can be found at local places like Target in the cleaning section. You can get it on Amazon too.ReplyCancel

    • Emma

      The place woth the beet price and fragrances I found is Sprouts although i found it not to be effective on whites.ReplyCancel

    • Kim

      I found Dr Bronner’s at the local grocery store…Hannaford’s. My bf of 12 yrs is allergic to many soaps and other scented things,(as am i)…laundry soap included, but the Dawn dish soap and Dr Bronner’s don’t seem to bother him…thankfully. I think the dawn dish soap works best for laundry applications because it breaks down the greasy stains far better than any other liquid soap i’ve ever tried. Heck, if they can use it to clean oil spill affected wildlife as well as their commercials show,i’d think it would clean up any oily stain my farrier/blacksmith boyfriend or my grand kids can get into,lol I also find that adding vinegar to the rinse water works wonders for getting all the residue out of the clothing,including any extra soap if you happen to use too much….and it makes bath,dish & hand towelsmuch more absorbent.ReplyCancel

      • Kim, I’m so glad to hear how well this is working for you! I definitely think the Dawn works best too. But I love the idea of adding vinegar! Thanks for sharing your results!ReplyCancel

  • seth

    I’ll have to give this a try though with Palmolive (that’s all we use) we have been using a dry recipe we found and due to my wanting to get the biggest bang for my buck we ended up making enough that batch that at a year and a half later we still have enough for 2 and a half more years I think lol. This gives us the ability to toy with other ideas j the mean time lol.ReplyCancel

    • Wow! That must have been quite the recipe for the dry recipe! It definitely sounds like you got bang for you buck on that one. Hope you enjoy this one too!ReplyCancel

  • Donna

    How much do you put in the washer ?ReplyCancel

    • I usually use about one cup per wash. I use up to two cups if it is really tough load or a really big load.ReplyCancel

  • MOMO

    I just have one questions, wouldn’t the boiling water melt the milk container?ReplyCancel

    • Nope! It definitely gets warm and bendy but not melty. However, the water only needs to be warm enough to dissolve the powder. So I usually let it cool down a little bit and don’t pour it straight off the stove.ReplyCancel

  • Just read this post yesterday, had just ran out of detergent, so I went to Kroger and bought the ingredients, cost $9.00 altogether,.I already have the Dawn. I’m going to try it later today,let you know how it goes.ReplyCancel

    • Awesome!! I’m so glad to hear this! Hope it works well for you!ReplyCancel

  • Judy

    I have tried this recipe and it works great. I find the clothes very soft, fresh smelling and clean. One small change in directions that I do is: boil the water in a pan, add the Borax and Washing Soda,stir to dissolve, then pour it into the container. I do use this in my HE front loading washer with no problems. I have also used the recipe with the grated Fels and liked it, but had to make sure there were no clumps(shook it a lot) before I added the soap to my washer.ReplyCancel

    • I’m so glad to hear this Judy! I also love your boiling idea. Definitely something to do if you are worried the boiling water might melt your container. You can boil it on the stove, let it cool, and then pour it in your container.ReplyCancel

  • Christine Holtzer

    I am still trying this, but so far impressed. I used it on some clothes that is really smelly and it cleaned it. I used the new Dawn that is sulfate free and Hypoallergenic since my husband has a Latex Food Protein Allergy I have to keep away from most of the fruit scents so this is working so far for my purposes. Thank you for the recipe. I was not wanting to grate a bar of soap.ReplyCancel

    • I’m so glad it is working for you Christine. I will definitely get the sulfate free and hypoallergenic Dawn next time! Great find!ReplyCancel

  • PurpleLady

    I am so allergic to soaps and cleaners. The only dishwashing soap I can use is Lemon Joy – not any of the other flavors. So far, I can use Arm & Hammer for sensitive skin and no commercial “softeners” at all. So, after reading all this good info, I am going to try this with my Lemon Joy and do I add vinegar into the washer separately, like in the “softener” slot. (I must use commercial, coin machines.)ReplyCancel

    • PurpleLady

      A question about urine smells, does this get rid of them? Bleach hasn’t worked, nor has baking soda. My husband is bed-ridden and this is a constant battle. I’m hoping the vinegar will work.ReplyCancel

      • I’m not sure about urine but I would think that the vinegar would help that!ReplyCancel

    • Let me know how Lemon Joy and/or Arm & Hammer work. I’m sure they will be fine. Hmm… I would experiment with the vinegar. Maybe on one load add it to the water with the detergent and the other in the softener slot. Good luck!ReplyCancel

  • Janice Pierson

    You could maybe try it on your sheets and if you like the way they turned out then use it on your towels etc….then if you don’t like it you could always wash your bathroom and kitchen rugs, dust rags etc.ReplyCancel

    • Great thought! That’s what I did at first too. Then I fell in love with it and use it for everything! I even make 4 gallons at a time!ReplyCancel

  • Sara Johnson

    I just finished using my first jug of this and it has worked great! I washed several loads of cloth diapers, with good results; the diapers got cleaner than they did with the Arm and Hammer detergent I had been using! Thanks for sharing these instructions.ReplyCancel

    • Awesome! I am so happy to hear this Sara!! So many people have asked if they work with diapers but since I have no children in the house I haven’t been able to answer. Thanks so much for sharing!ReplyCancel

  • Gayle

    Can’t wait to try this, I’m exactly the same, I love homemade cleaning products & would like to make laundry detergent but it all looked too hard & didn’t look like it was much cheaper. I make a miracle cleaner, which is like an all purpose cleaner, I also use it as a pre-wash spray. A window cleaner which is better than the commercial ones in my opinion. I also use Enjo cleaning clothes & mop heads which are excellent & you only need to use water with them.ReplyCancel

    • Wow! Your homemade cleaning products sounds awesome! I definitely want to try those Enjo cleaning cloths too. Hope you like this recipe as much as the others you make!ReplyCancel

  • Wow, I am excited to try this. seems like I wash daily, just for
    the “2 of us”.
    Thanks bunches,
    PAMReplyCancel

  • P K

    Hi Megan, I lives in UK. I didn’t found same product on Amazon UK site. There are any another name or option so I can buy from Amazon UK. Thanks in advance.ReplyCancel

  • Linda

    Hi Megan, I have been using your recipe for laundry detergent for over 6 months or more now. I just don’t remember when I first started, but it’s been a while. I love it!!! On my shirts/blouses I use between 1/4 and 1/2 cup of detergent, as they don’t need more. All other clothes I use 1/2 cup. The clothes feel nice, smell good, and are clean. I won’t go back to store bought ever haha. I do add a little baking soda to it while it’s agitating for softening, otherwise, it’s all your recipe. Thank you so much, it is saving me lots of money, which is always such a blessing 🙂 LindaReplyCancel

    • Hi Linda! Thank you so much for your comment and getting back to me as to how you like the detergent! That’s awesome to hear! I love the baking soda idea too. Happy washing! 🙂ReplyCancel

  • Jamie

    I have found a more concentrated recipe on Pinterest with the same ingredients, I love it! Only takes 1/4 cup per load!ReplyCancel

    • Awesome! I’ve actually doubled the recipe before to make it more concentrated and use about 1/2 a cup per load! Works great!ReplyCancel

  • Love that red tea kettle!!ReplyCancel

  • Anita

    I just tried the home made dryer sponges (I think was yours also) can’t wait to try this out! I’m so over grating soap lol.ReplyCancel

    • Awesome! I am so glad you like the dryer sponges! I think you will love this soap recipe. I will never go back. I make it once every 6 months maybe? So 30 minutes to make twice a year and under $10 a year. Winning!ReplyCancel

  • Sue

    Love all the feedback. Am almost out of the store brand and have a milk jug almost empty will get the ingredients this week. Can’t wait to try it.ReplyCancel

  • Can you tell me how much essential oil you would suggest adding to add to the mix? My daughter and I have been using Mrs. Meyer’s Clean Day Lavender laundry detergent for the family. We love it because it smells so wonderful and performs pretty darn well. HOWEVER, it is expensive and we would just as soon make your recipe and add lavender essential oil to make it smell delightful and clean! Many thanks!ReplyCancel

    • I’ve never actually done it myself but I would think just a few drops. I would do a couple of drops at a time and just scent it to your preference!ReplyCancel

      • Jean Lawes

        Swell! Thanks for your reply! We will give it a try! Just love your blog!ReplyCancel

        • Yay!! Thanks so much for commenting!! Hope it works well for you!ReplyCancel

I love coffee table books. I love to look at them, to stack them, to tear pages out of them and frame them. I especially like to dig through piles of old books at thrift stores to see what treasures I can find.

However, some of the best books on the inside aren’t the best looking on the outside. Like this one I scored for $2.

Painting a Book with Chalk Paint | www.rappsodyinrooms.com #chalkpaint #painting #styling #diy

I loved the material inside and the awesome retro pictures (that are now back in style). I grabbed this one with an idea to frame some of the pictures.

Painting a Book with Chalk Paint | www.rappsodyinrooms.com #chalkpaint #painting #styling #diy

Painting a Book with Chalk Paint | www.rappsodyinrooms.com #chalkpaint #painting #styling #diy

Painting a Book with Chalk Paint | www.rappsodyinrooms.com #chalkpaint #painting #styling #diy

I also thought it would be a great book to try something to make it look a little snazzier – painting it!

I had just finished painting my shelf with Annie Sloan chalk paint in Simply White and was already dying to try another project with it.

So I painted my book with chalk paint. Two coats and it was done.

Painting a Book with Chalk Paint | www.rappsodyinrooms.com #chalkpaint #painting #styling #diy

The white was better but still kind of boring.

I decided to (finally) try this Frogtape chevron tape that I got at Haven last year.

Painting a Book with Chalk Paint | www.rappsodyinrooms.com #chalkpaint #painting #styling #diy

Except I didn’t want just typical chevron; I wanted to mix it up a little. My mixing it up consisted of off centering the lines of tape with each other to give it less of a chevron look and more of a geometric look.

Painting a Book with Chalk Paint | www.rappsodyinrooms.com #chalkpaint #painting #styling #diy

Then I used my gold craft paint and painted two coats over it.

Painting a Book with Chalk Paint | www.rappsodyinrooms.com #chalkpaint #painting #styling #diy

I’m thrilled by how I turned this beige-y boring book into a shimmering showstopper. But, hey, if I don’t like it tomorrow I can always paint it again!

Painting a Book with Chalk Paint | www.rappsodyinrooms.com #chalkpaint #painting #styling #diy

Painting a Book with Chalk Paint | www.rappsodyinrooms.com #chalkpaint #painting #styling #diy

Painting a Book with Chalk Paint | www.rappsodyinrooms.com #chalkpaint #painting #styling #diyI’m still playing around where it will end up in the house (probably multiple places) but right now it is glitzing up the media center (and cars!).

Painting a Book with Chalk Paint | www.rappsodyinrooms.com #chalkpaint #painting #styling #diyPainting a Book with Chalk Paint | www.rappsodyinrooms.com #chalkpaint #painting #styling #diy

Painting a Book with Chalk Paint | www.rappsodyinrooms.com #chalkpaint #painting #styling #diyAnyone else addicted to scavenging for thrift store coffee books? Or how about painting books? I think I’m hooked now!

Painting a Book with Chalk Paint | www.rappsodyinrooms.com #chalkpaint #painting #styling #diySharing this post here:

  • What a fun project Megan! I love your mixing it up chevron 😉ReplyCancel

    • Thanks so much Therese! I always love trying something just a little off – it’s more fun that way!ReplyCancel

  • What a great idea, adds such a pop of color under the red car…fun!
    Blessings,
    CindyReplyCancel

    • Thanks Cindy! It is a good blending of my husband and me. Gold = me. Cars = him!ReplyCancel

  • I never in a million years would have thought to do this. I’m going to send this to my friend who works at Estates Revisited to show off what you did with one of their items.ReplyCancel

    • Aw, thank you! That is so sweet Paula! It’s what happens when you set a paint can down in my house. Suddenly I start looking at things right beside it and think, “I can paint you too!” Ha!ReplyCancel