Step outside and breathe in deep. There is definitely a hint of fall in the air. And yes, a hint of a still simmering summer heat – but here in Virginia, once September hits fall is close behind! So even if the weather isn’t quite there, my fall spirit is!

I am kicking off September with an homage to fall decorating! I’ve been itching to try this project ever since I saw it over on my pal’s site Teal & Lime, and I thought this fall was the perfect time to try it out.

So here’s how to turn cheap plastic gourds, pumpkins, and leaves into high-end ceramic looking items for a bargain price and with your own two hands and a little plaster of paris!
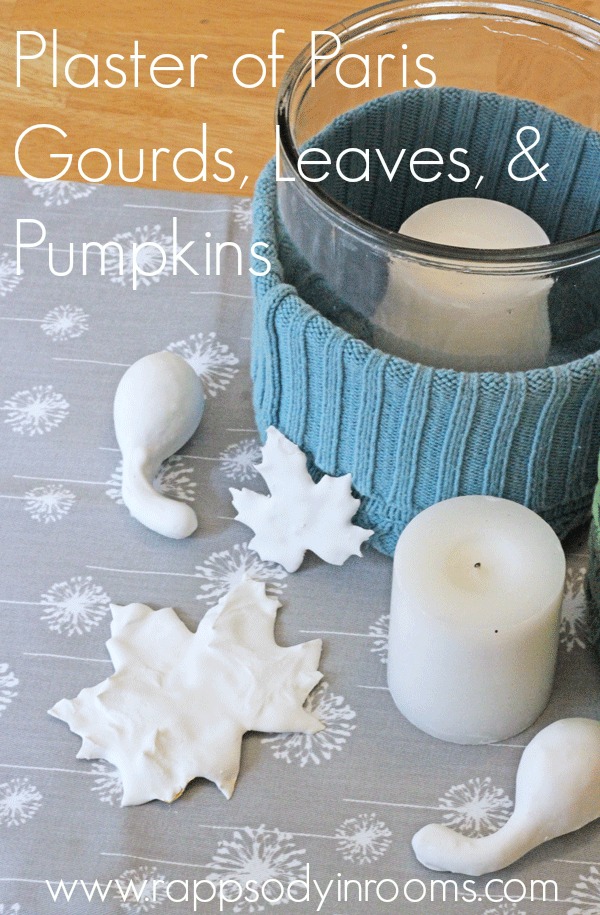
Fall Craft: Plaster of Paris Gourds, Leaves, and Pumpkins | www.rappsodyinroooms.com

Plaster of Paris Gourds, Leaves, and Pumpkins

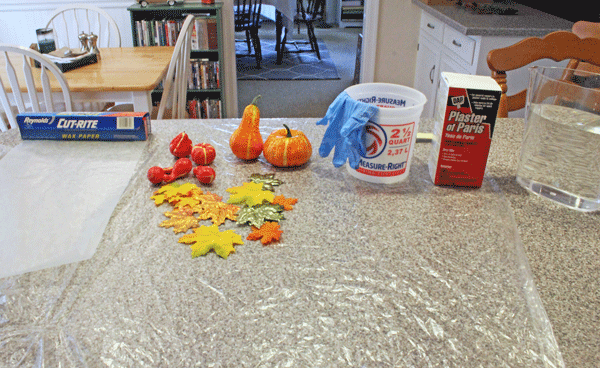
Supplies

  • Plaster of Paris (the small box should do)
  • A mixing bucket (found in the paint aisle)
  • A paint stirrer
  • Plastic gourds, pumpkins, and fake leaves (I found my at the dollar store)
  • Waxed paper
  • Disposable gloves

Fall Craft: Plaster of Paris Gourds, Leaves, and Pumpkins | www.rappsodyinroooms.com
Directions

1. Set out all your supplies. Once you get to mixing you are going to move quickly.

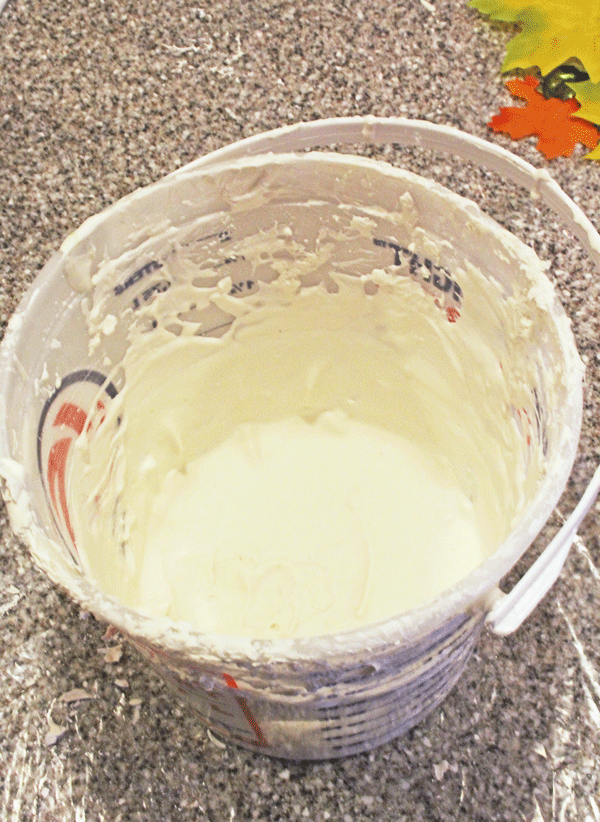
2. Put on your disposable gloves and mix the Plaster of Paris according to the directions on the box. You will want it to be the consistency of runny pancake batter.
Fall Craft: Plaster of Paris Gourds, Leaves, and Pumpkins | www.rappsodyinroooms.com
3. Take each item one a at time and dip into the mixture. Don’t worry if you don’t get perfect coverage the first dip. Some of my items I had to dip 2-3 times after they completely dry.

4. Pace on wax paper to dry.

Fall Craft: Plaster of Paris Gourds, Leaves, and Pumpkins | www.rappsodyinroooms.com
For the leaves, put it on the surface of the mixture and then slowly press it down, covering it completely. Then scoop it out gently, drying not to let all the mixture drip off the leaf. I found these were better looking with a thick mixture on top.

Fall Craft: Plaster of Paris Gourds, Leaves, and Pumpkins | www.rappsodyinroooms.com
It took me a couple of tries to really get a good method down, but I learned to do thinner coats and just to keep redipping until they looked like I wanted them too! If you mess up, you can just crack the plaster off when it dries and try again.

Fall Craft: Plaster of Paris Gourds, Leaves, and Pumpkins | www.rappsodyinroooms.comFall Craft: Plaster of Paris Gourds, Leaves, and Pumpkins | www.rappsodyinroooms.comFall Craft: Plaster of Paris Gourds, Leaves, and Pumpkins | www.rappsodyinroooms.com
This was such a fun project to do this past Saturday afternoon. I setup all my supplies on the kitchen counter and poor Eric came in to eat lunch and had to go eat in the basement (because I was recording a how-to video too – look for that soon – so I needed no ambient noises like crinkling and crunching from eating). Ahh the supportive husband of the blogger, right?!

That is also a word to the wise, since I had to redip the items a few times my supplies took over the counter for an hour or so. So be prepared to have that space be out of commission for a while!

Are you looking forward to fall? Any fall projects you are working on?

PS – Check out the video tutorial for this project!

PPS – And learn how to make the sweater wrapped vases shown in the pictures!

  • What a great idea! I like the look of white items for fall. I wonder if you could turn the leaves into hanging ornaments by drilling a hole through the plaster of paris? They might look nice hanging from a branch in a vase.ReplyCancel

    • Ooo those are fun ideas, Paula! I really like white items for fall too! It would be fun to transition them to winter too. Maybe a future ornament?!ReplyCancel

  • I think I will do this but maybe add a bit of glitter to them the final coat.ReplyCancel

    • Loooove that idea Rosemary! I think I might do that too! I was also thinking of spray painting them with a glitter spray too – or a pretty metallic color.ReplyCancel

Don’t you love when an original idea hits you?

Mine usually just come out of nowhere. It’s a thrilling feeling for me. More often than not, it’s when my mind is really open to new ideas. Like when I’m trying to fall asleep, am driving to work, on a run or taking a shower.

However this idea came while peacefully picking peppers in the garden. The summer air was just cooling, the sun was slanting across the back yard, and the neighborhood had that just turning evening peaceful feeling, tempered with the slight hum of children playing and lawnmowers in the distance. This is ideal thinking time for me.

It was while looking at my plentiful pepper plants that a stuffed pepper recipe just came to me. Just like the mosquitoes that effortlessly come to me and eat.me.alive.

Vegetarian Stuffed Peppers | www.rappsodyinrooms.com

Vegetarian Stuffed Peppers

Ingredients

  • 1 ½ cup of cooked barley
  • 1 bag of cooked fake meat crumbles, lightly seasoned with seasoning salt
  • 1 cup of chunky salsa
  • 4 green peppers
  • ½ cup to 1 cup of favorite shredded cheese

Directions

  • Preheat oven to 350 degrees.
  • Wash peppers and cut off the very tops of the peppers, leaving at much stuffing room as possible. Clean out the seeds, leaving a hollow pepper.
  • Mix together barley, fake meat crumbles, and salsa in medium bowl.
  • Scoop mixture into peppers, pressing until each pepper is full.
  • Line peppers on baking sheet. Cook for 20 minutes.
  • Take out of oven and sprinkle with cheese (how much you sprinkle depends on your cheese preference). Cook for 5 additional minutes.
  • Take out and enjoy!

Vegetarian Stuffed Peppers | www.rappsodyinrooms.com

Vegetarian Stuffed Peppers | www.rappsodyinrooms.com

I’d love to know if you make this recipe – real meat or not! Tag me with a picture on Facebook or Instagram to see your lovely creation!

  • Yummy! The peppers have been going to town in our garden. I’ll have to try using barley instead of rice the next time I make stuffed peppers.ReplyCancel

    • Apparently the peppers like the weather this summer! They did awful last year in my garden. I definitely recommend the barley! It’s my substitution for rice now!ReplyCancel

  • Looks tasty. I usually stuff the peppers with rice and meat, but I’ll try to cook them according to your recipe.ReplyCancel

This week has been the most random, oddball kind of week. The kind when you start the day with a list of things you think you will accomplish and by the end of the day having done a bunch of random things but nothing on your list. Oh well, real life, you win again. You also amuse me most of the time. Thankfully.

With this random week almost behind me, I thought I would bring the randomness to the blog. By random, I mean through random items we’ve gotten (thrifted, gifted, and new home additions) that you have yet to see on the blog. Some have a special spot in the home already; others are randomly waiting in the middle of rooms or perched on shelves waiting to find their special space.

The Gifted, Thrifted, and New Home Additions | www.rappsodyinrooms.com

Let’s start with this giant art beauty that I picked up at the DAV thrift store for $6. It is 90’s and colorful and mod and I love it. Right now it’s just going the leaning game around the house, but that’s just because we’ve been too lazy to hang it in our bedroom. It will be replacing the owls. Don’t the colors match perfectly?

The Gifted, Thrifted, and New Home Additions | www.rappsodyinrooms.com

The Gifted, Thrifted, and New Home Additions | www.rappsodyinrooms.com

These are a fun little small gift that my Dad’s wife picked up for us. Isn’t this the coolest salt and pepper set? It’s so woodsy and industrial. It makes me want to grind pepper all day long.

The Gifted, Thrifted, and New Home Additions | www.rappsodyinrooms.com

The Gifted, Thrifted, and New Home Additions | www.rappsodyinrooms.com

This Eames chair we bought from a friend may be the crowning glory (and most expensive but still a deal) of all of our items. Eric and I have both loved these types of chairs for quite some time, so even though we are torn on where to put it, we knew it was a smart buy for us.

The Gifted, Thrifted, and New Home Additions | www.rappsodyinrooms.com

Eric’s favorite suggestion of where to put it? Get rid of the dining room table and put it there. I could be convinced….

The Gifted, Thrifted, and New Home Additions | www.rappsodyinrooms.com

Also, we might end up recovering the ice blue linen. We like it but were thinking something white might be fun. We’ll see…and we’ll also show you if it ends up in the Mego Cave, living room, bedroom or basement. Choices, choices…

I’m SO excited about this moment of glory in our living room. I’m the girl who loves a comfy blanket all year round. My cousin-in-law gave me a super snuggly one for Christmas that I have been using every day. However, I like the tucked away blanket look when I’m not using it and this super plush blanket didn’t have a really good hiding place. I had the light bulb moment of a storage ottoman that could also be my purse holder AND extra seating PLUS blanket holder.

The Gifted, Thrifted, and New Home Additions | www.rappsodyinrooms.com

The Gifted, Thrifted, and New Home Additions | www.rappsodyinrooms.com

I found this one on Joss & Main and snatched it right up. I love the emerald green and lushness of the velvet. Plus, tufting is always a win in my book.

The Gifted, Thrifted, and New Home Additions | www.rappsodyinrooms.com

The Gifted, Thrifted, and New Home Additions | www.rappsodyinrooms.com

The Gifted, Thrifted, and New Home Additions | www.rappsodyinrooms.com

Finally, moving down to the basement, we have this cube bookcase (on castors!) that is having a random moment in the middle of the basement. We have some ideas on where this should go too, but right now it just holds a few cars. We’re thinking this is going to stay in the basement to hold even more of Eric’s cars but it needs to be in a place where it makes a little more sense.

The Gifted, Thrifted, and New Home Additions | www.rappsodyinrooms.com

So how’s that for random? But aren’t all those pieces so much fun!? Which one is your favorite? Any ideas of where some of the misplaced items should go?

  • i am glad i am not the only one who uses a blanket on the couch year round! and i LOVE that eames chair- SWOOOOOON!
    and your new art rocks, too!ReplyCancel

    • Blankets forever and for all seasons! I think I am colder in the summer than in the winter. That darn A/C freezes me!

      Yes, I totally agree on the Eames chair. I swoon right into every day. 🙂ReplyCancel

  • I use a blanket year round, too! Your ottoman is a perfect place to store one when you aren’t using it.

    I need to learn more about Eames. Is this a vintage chair??ReplyCancel

    • Paula, this Eames chair is a reproduction but you can also buy the real deals – new and vintage I believe. I don’t think this one is all that old either. They were designed by Ray and Charles Eames for their Herman Miller furniture company. It is just a classic mid century type of chair.ReplyCancel

  • Emily

    Hi there! I was wondering if you happened to know where I could get that awesome salt and pepper shaker set?ReplyCancel

    • Hi Emily! Oh man, I wish I could help but unfortunately they were a gift from someone who found them at a yard sale!ReplyCancel

This is a sponsored post on behalf of Tide OXI Multi-Purpose Stain Remover. All opinions are 100% mine. 

With school buses starting to circulate the neighborhood,  the sounds of the marching band wafting over to our house from the nearby high school, and recent unseasonable cool, humid-free summer days, my mind is definitely starting to think of fall and all it brings.

The cool night, beautiful colors, and cozy nights in by our fireplace.

How to Clean and Paint a Fireplace Box | www.rappsodyinrooms.com

In our case, that means an electric fireplace that we love and makes it no less cozy in our warm, color-drenched living room.

However, the fireplace box did need a little sprucing up to get it ready for daily use come September (oh well, let’s be real – the fireplace has been turned on a couple times this summer to up the cozy factor).

Our electric fireplace is basically a black box; a black box that is mostly hidden in the dark fireplace box. However, it was only dark because of the dirty soot stains left behind from its wood burning days. It was a just dirty, uneven mess that I knew could be better.

How to Clean and Paint a Fireplace Box | www.rappsodyinrooms.com

The plan: clean the fireplace box and then paint it a nice even black.

How to Clean and Paint a Fireplace Box | www.rappsodyinrooms.com

Step 1 was cleaning out the fireplace box. I decided to use Tide OXI Multi-Purpose Stain Remover (purchased at The Home Depot). I love that Tide is branching out from the laundry room and making a product that can be used to clean just about anything around the house. It can be a laundry booster, a upholstery cleaner…or a fireplace box cleaner!

How to Clean and Paint a Fireplace Box | www.rappsodyinrooms.com

After taking out the electric fireplace and vacuuming out the dead bugs hiding under it (ew!), I made sure to protect the slate around the fireplace by putting down a plastic drop cloth and then another fabric one on top (just because I kept sticking to the plastic one).

How to Clean and Paint a Fireplace Box | www.rappsodyinrooms.com

Then I mixed the Tide OXI Multi-Purpose Stain Remover according to the instructions on the box (basically one scoop of cleaner for every 4 scoops of warm water). Make sure you use warm water to help dissolve the powder to get a really good solution.

How to Clean and Paint a Fireplace Box | www.rappsodyinrooms.com

Once I had my solution mixed in a bucket, I used a bristle brush to scrub, scrub, scrub! It was a continual process of dip, scrub, dip, scrub. I changed the solution a couple of times as the water blackened. It was definitely an intense little scrubbing session but the Tide worked like a charm!

How to Clean and Paint a Fireplace Box | www.rappsodyinrooms.com

Here you can just see the dirt dripping down (and off) the brick!

How to Clean and Paint a Fireplace Box | www.rappsodyinrooms.com

After my last Tide scrub I did one pass over with the bristle brush and plain water just to get everything washed away. It really was an incredible difference!

How to Clean and Paint a Fireplace Box | www.rappsodyinrooms.com

Step 2 was painting the fireplace box.

Now, a word of warning for this step. Since we use an electric fireplace it doesn’t get all that hot in the fireplace box. However, for those of you who use gas or regular logs, you may just want to clean it and be done.

I used Rust-Oleum’s High Heat paint in satin black (also bought at The Home Depot) that is meant for temperatures up to 1200 degrees.

How to Clean and Paint a Fireplace Box | www.rappsodyinrooms.com

After I taped around the slate, I used a cheap paint brush that I could just throw away after using it and started painting. It was a fairly quick process, even with all those mortar seams. Here was my first coat, splotchy but still looking nice!

How to Clean and Paint a Fireplace Box | www.rappsodyinrooms.com

After my second coat I was finished!

How to Clean and Paint a Fireplace Box | www.rappsodyinrooms.com

I love the look, especially after I loaded our electric logs back in. The black box almost disappears – just like I was hoping!

How to Clean and Paint a Fireplace Box | www.rappsodyinrooms.com

How to Clean and Paint a Fireplace Box | www.rappsodyinrooms.com

How to Clean and Paint a Fireplace Box | www.rappsodyinrooms.com

Now we are definitely ready for those chilly fall nights so we can curl up in our cozy living room with the fire on!

  • Wow, what a difference! I saw Tide Oxy on a commercial and have been wanting to try it on a vintage chaise lounge I got from my grandmother. It’s vinyl, cream upholstery that is very dingy from years of dust and not being cleaned regularly.

    Can’t hurt to try!ReplyCancel

    • Thank you Sharon! You should definitely try Tide on your chaise lounge! I was so pleased on how it worked on the fireplace. Plus, they said it can be used on upholstery and various other surfaces. Just make sure to make the solution with very warm, almost hot water to help dissolve the Tide.ReplyCancel

  • That had to be a dirty job and now your fireplace looks so good! I am really impressed with all of the jobs around the house that I’ve tried with Tide Oxi. It worked so well on my bathroom tile that I volunteered myself to help my friend clean hers.ReplyCancel

    • Thank you so much! I definitely need to try the Tide with grout. Although I don’t know if I would ever offer my service to someone else for it! I’m impressed!ReplyCancel

Two people walk into a room. One slice of chocolate chip zucchini bread lies between them. Eying each other cautiously they begin to circle, wondering to themselves, “Who will make the first move?”

Chocolate Chip Zucchini Bread Recipe | www.rappsodyinrooms.com

All it takes is a slight shift of the finger and the two swoop down on the bread, hoping to be the lucky winner of the last piece of chocolate chip zucchini bread.

Okay, that might be slightly dramatic, but I promise, if you were ever going to fight someone for food, this is the recipe.

Chocolate Chip Zucchini Bread Recipe | www.rappsodyinrooms.com

I can say that because this recipe is 100% Sally’s Baking Addiction’s and I’m just here to pass this on (in the height of zucchini season) and urge you to MAKE THIS NOW!

Although, while it can technically be called bread, it’s definitely more cake like in ingredients so perhaps pair it with a healthy side when you gobble it down for breakfast (or for that 11am/3pm snack).

Chocolate Chip Zucchini Bread Recipe | www.rappsodyinrooms.com

This oh so decadent bread with its chocolate chips, hidden vegetables, and oh-so-gush worthy oatmeal streusel on top is the hing bake sales could be made famous for.

It really is that good.

Let me tempt you with delicious pictures.

Chocolate Chip Zucchini Bread Recipe | www.rappsodyinrooms.com

Chocolate Chip Zucchini Bread Recipe | www.rappsodyinrooms.com

Chocolate Chip Zucchini Bread Recipe | www.rappsodyinrooms.com

Now click on over to check out the recipe so you can make it this weekend! You won’t be sorry!

  • Yum! I adore zucchini bread and have never had it with chocolate chips. I’ll have to try this.ReplyCancel

    • I definitely think you should! I do wonder where I picked up the chocolate chip part of this recipe. It doesn’t seem like a southern thing. Everyone I work with was confused about the chocolate chips…but were more than okay with it once they tasted it!ReplyCancel