Top of the day to you wonderful people, you! I hope you are having a sparkling day. That’s what my sister likes to tell me. Isn’t it such a fun statement. I always remember walking out the door for school and hearing my sister say, “Have a sparkling day!” So I pass that on to you.

Anyways, another item that made my day sparkle was when my friend and fellow blogger Paula of Virginia Sweet Pea asked me if I wanted to do the Tour Through Blogland with her. It sounded like fun so I was in.

Basically, I’m going to feature some other great bloggers that I thought you may be interested in and then let you in some behind the scenes info about myself.

Tour-Through-Blogland-with-Rappsody-in-Rooms-Header


First off let’s talk about my super creative – and local friend – Paula. I met her last year at Haven Conference and am SO glad I did. We probably never would have met otherwise even though we only live 20 minutes away from each other.

Haven Conference Recap 2014 with VIDEO | www.rappsodyinrooms.com

Paula is all of the way on the left.

I’m always impressed with Paula’s creativity and super detailed and impressive projects. She can make the craftiest wreaths or really intensive woodworking projects. One of my favorites is her Plow and Hearth Knockoff Chevron End Table. It looks exactly like the pricey one but was a fraction of the cost. Plus, she got to do it with her husband, which probably makes it even that much more special.
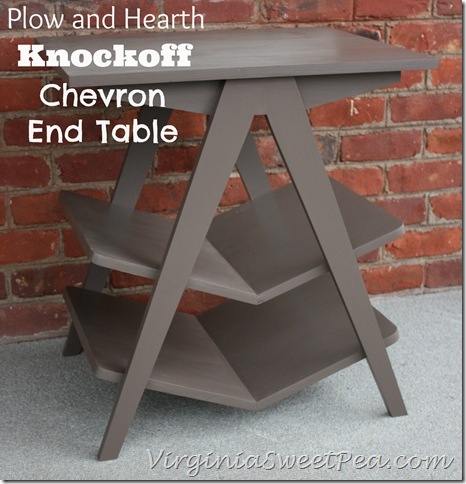
Plow-and-Hearth-Knockoff-Chevron-End-Table-by-virginiasweetpea_com_thumb

Make sure to head over to Paula’s site to browse around and check out her awesome project gallery.

About Me

I’ve been blogging for 2 1/2 years and love having a creative outlet like this! I started this blog just a couple of months after I quit an all-consuming job that didn’t let me have a life – or hobby – at that. It was fun to realize, once I had time to breathe and think about something besides my job, that I was craving more creativity in my life. Plus, it would allow me to share my life with my friends and family – most of whom are out of town.

My current day job is working as a Communications Coordinator at our local water company. If you ever told me that I would not only work for a water company but LOVE working there, I wouldn’t have believed you. It just goes to show that if you work for and with great people, it makes a wonderful work environment. Plus, I was basically able to write my own job description which is pretty darn cool.

I am also a travel lover. I have been fortunate to spend time (in college) in some pretty amazing places, like China, Australia, New Zealand, France and Spain. Eric and I have big plans on travelling for the rest of our lives.

www.rappsodyinrooms,com

Oh yes, I am married to my best friend, man of my dreams, and my perfect counterpart. He was recently described as, “If you were more patient, you would be asleep”. Which is what I need in a husband since I can be…err…kind of high-strung and fiery, just like my hair.

eric-megan-rapp-las-vegas

What am I working on right now?

Well, I tend to have quite a few projects going on at once. I have a bunch of wood leaning against the wall in the other room waiting for me to make a bench out of it for our back deck.

Projects I

I have paint swatches strewn out in our master bathroom as I am painting every single surface in that room – plus I need to add some major style to it with accessories and artwork.

And, like always, we are thinking about making some changes to our living room, since it seems to be the room that we can never seem to figure out. Many chairs, layouts, and rugs have come and gone in that room. Thinking about changing it up again. Geesh!

How to make a curtain rod from an electrical conduit | www.rappsodyinrooms.com

How does my work differ from those in this genre?

Well, I am the girl who embraces all of the color, all of the time, but has a husband with likes things a little bit more toned down. So it’s fun making that work together. Plus, we like to mix traditional and modern, which can also be interesting. But decorating – it’s all be done before, right?! So what really makes the difference between me and everyone else? Well, I like to think it is me. In all my interesting, quirky, pensive, funny ways. I hope that comes across in my projects and writing. Plus, I don’t just stick to decorating. I like to branch out with vegetarian recipes, desserts, and travel posts.

Why do I write/create the way that I do?

Basically, I can’t help it. I LOVE doing anything creative. It’s in my blood. I think it started with my mom, who always had our house perfectly decorated. It wasn’t a showroom, but a lived in style that was meticulously and gorgeously done – even if it was classic country chic. Decorating and DIY are just part of who I am – it’s where my thoughts wander almost constantly.

How does my writing/creative process work?

Well my creative process just kind of bounces around to what needs to be done in the house or what just isn’t setting well with me. I tend to think a lot before making any type of decision. Or if something isn’t quite gelling with me in our house, staring at it really helps me figure out what’s wrong and what I can do to make it better. Or sometimes it takes getting out of the house and hitting a thrift store to open up a new creative vein!

Now, let the Tour of Blogland Continue with…

Amy blogs at Always Never Done. We met at Haven this year and let me just say, she is a blast to hang out with! I had so much fun attending some classes with her and getting to know her. Plus, her blog is so fresh and creative.

Alwats Never Done

A simply complex gal from the heart of the PA country side. A mom, wife, dog lover and DIY fanatic. I can and will Up-Cycle just about anything and turn into a functional and beautiful work of art. I also revamp run down furniture, paint it and sell it a local shop in my hometown.

She loves painting wall in creative ways, as shown in her herringbone ceiling project (which is a stunner)!

Herringbone Painted Ceiling | Always Never Done

Lindee is a blogger at The Lindee Tree – and is also a new local friend! We also met at Haven this year and fun fact – she is a regular on Daytime Blue Ridge – the show that I’ve been on a few times.

The Lindee Tree

I am a right-brained, American woman married to a left-brained Indian man. I love art, design, up-cycling and multiple DIY projects at the same time. He loves simplicity and order. I try to combine our personalities and cultural differences through art, design, food, and raising kids.

Outside of writing the blog, I run a small business of “odd jobs.” I host a variety of art/design events in the Roanoke Valley, design and host “Living with Lindee,” (a lifestyle and design segment,) for NBC, WSLS 10 “Daytime Blue Ridge,” and teach cooking classes at the “Roanoke Natural Foods Co-op.” 

I love her dining room makeover project. It’s gorgeous and her chairs were actually featured in HGTV magazine!
Dining-Room-Makeover-The-Lindee-Tree
Last, but certainly not least, is another local friend I met at Haven. Carrie blogs at Lovely, Etc. We didn’t get much time to talk at Haven but Carrie was just so sweet in those couple of minutes we talked that I can’t wait to get to know her better!
Carrie Lovely Etc


I love figuring out new ways to make my home tell a beautiful story without blowing my family’s budget.

I love the moment when you see some old piece of junk and a spark ignites and you suddenly know how to make it beautiful and desirable and useful and loved again.

I love feeling like I can do whatever I put my mind to.

Lovely Etc. is a place to join together with others who know that inexpensive doesn’t mean ugly. That beautiful doesn’t mean trendy. Who want their homes to reflect the things that make them feel happy and safe and comfortable.

I love her bold use of color and style – like in this painted plank wall.

DIY-Painted-plank-wall_thumb

I hope that you enjoyed meeting my friends and make sure to check out all their awesomeness on their blogs. Plus they’ll be hosting the Tour Through Blogland next week, so make sure to check back for those posts!

  • Thank you so much for the awesome feature! I’m so glad that we met through our blogs and I can’t wait to hang out with you again, hopefully very soon!ReplyCancel

  • Thanks for sharing! –and what creative ladies. Love your curtains. I am getting ready to re-do my husband’s office and need to make some. My son’s favorite part of this post is you on the camel. Ha! Great picture!ReplyCancel

    • Haha! I love camels!

      Sounds like a fun curtain project ahead of you too! I was glad I was able to introduce you on my blog…along with all the other creative ladies too!ReplyCancel

Here’s the story, of a good ole gnome, who was just living a lovely life in a garden.

Until one day, he met his maker, and all that was left was a foot.

Fortunately, sometimes all I need is a foot to go a mile…or just to make a project.

From Trash to Treasure: Gnome Foot Planter | www.rappsodyinrooms.com

This video might have been the saddest and the funniest video process yet.

Sad Parts:

  • I counted over 10 mosquito bites on my legs after filming the portion outside.
  • I broke my tripod before I filmed the last segment. 🙁

Funniest Parts:

  • Literally, not 30 seconds before the breaking of the tripod, Eric asked me if I needed a new tripod. Mine was working just fine at that point so I hurriedly said no and went on my way. Thirty seconds later I called out from the other room, “Changed my mind. I DO need a new tripod.”
  • Eric then came up with the genius idea of using a ladder as a stand-in.
  • Eric continually made squawking noises from the other room while I was starting to film.

The Tripod Debacle | www.rappsodyinrooms.com

I think that about sums it up. Plus I wore a new dress that I am loving so hard right now. So that was obviously a plus.

So here’s a little video about a solo gnome’s foot makeover story.

You can read the full tutorial with step-by-step pictures right now!

Hope you all have a great weekend!

Sometimes it’s the most unusual items that make the best additions to your home.

From Trash to Treasure: Gnome Foot Planter | www.rappsodyinrooms.com

But it takes a little bit of out of the box thinking and risk taking to make these conversations part of your home.

My newest DIY addition to the house was the direct result of a tragic garden gnome accident. Yes, you read that correctly. Poor Mr. Gnomey had a rough day and lost a foot.

From Trash to Treasure: Gnome Foot Planter | www.rappsodyinrooms.com

Although the accident happened last fall and the foot was lost under leaves for quite some time. Then one spring day I came upon the lone foot (while the rest of the gnome had already passed to his final resting place). When I picked up the foot I knew that this foot was here to stay.

This unseasonably cool summer weekend I decided it was the perfect time to throw on my scrubby spray paint clothes and gild this foot up.

From Trash to Treasure: Gnome Foot Planter | www.rappsodyinrooms.com

Yup, I painted a tragic gnome foot gold.

And I love it. It’s perfectly posh and quirky. Words I like to thing represent me, right? 🙂

Then  just filled it with a little dirt and this gorgeous green ground cover that has sprouted around our yard.

From Trash to Treasure: Gnome Foot Planter | www.rappsodyinrooms.com

From Trash to Treasure: Gnome Foot Planter | www.rappsodyinrooms.com

I think the hardest part was figuring out where to put this little foot. I’ve tried him a few places but I think the foot will stay in the Mego Cave window…for now.

From Trash to Treasure: Gnome Foot Planter | www.rappsodyinrooms.com

From Trash to Treasure: Gnome Foot Planter | www.rappsodyinrooms.com

From Trash to Treasure: Gnome Foot Planter | www.rappsodyinrooms.com

From Trash to Treasure: Gnome Foot Planter | www.rappsodyinrooms.com

Ha! Bet you weren’t expected to see a gold gnome foot planter today, huh?

What’s the weirdest trash-to-treasure upcycle you’ve ever done (or seen)?

  • You were so smart to turn your gnome’s foot into a planter. It looks great in your window!ReplyCancel

  • Nancy

    What a coincidence! My gnome lost his foot a couple of weeks ago in a freak accident involving a squirrel and a birdhouse. The birdhouse was empty at the time and the gnome was the only casualty. If I never get around to gluing his foot back on, I will have been inspired by your gnome shoe turned planter. Thanks!ReplyCancel

    • Oh my goodness! Gnome accidents abound! You should definitely turn that foot into a planter!ReplyCancel

If you’re happy that it’s Friday clap your hands.

CLAP CLAP.

Just sayin.

How to Paint a Bathroom Ceiling with an instructional VIDEO | www.rappsodyinrooms.com

Anyways, today I’m back with my how to paint a bathroom ceiling video!

Email subscribers click here to view the video.

Behind the Scenes:

  • How many outfit changes can a girl have in one short video? I’m counting three. That’s ridiculous. One “nice” scrubby outfit that I realized I didn’t  want to get paint on so I changed into an even scrubbier outfit. For the final reveal I’m in a work outfit…because I filmed that much later…after work.
  • I used two different cameras to film this video (I upgraded mid taping). Can you tell?
  • For some reason saying “tape” was really hard for me. I kept saying “paint” instead.

Hope you all enjoyed and have a ggggggggggggreat weekend!!

  • Loving your videos! I really dislike painting ceilings but a bathroom isn’t too bad since it is so small.ReplyCancel

    • Thank you Paula! Yes, ceilings are a pain, but I think it’s just getting up the gumption to paint them that’s half the battle!ReplyCancel

Let me start by saying that painting a ceiling is probably my least favorite thing on the list of all things DIY.

So much so that when we started looking up at our ceilings that are in need of major touchups, I had the idea of paying someone probably a couple thousand dollars to do it for me.

However, I knew I could tackle the bathroom ceilings. Those smooth ceilings and the room’s small footprint didn’t scare this girl.

So I did it. It one afternoon. It was actually easy.

Then this little thing called empowerment kicked in.

One ceiling done and awakened the voice in me that said, “You can do it, even the textured ceilings!” Because that’s all you really need is empowerment. The information on how to do something is always out there. It’s just believing in yourself enough to know that you can do it.

So I now know I can do it. How long is it going to take me? Probably a very long time. Thankfully, there aren’t gaping holes or major stains on the ceiling that make it essential to paint the ceiling. There are just those spots here and there that need to get it done.

So just remember this, start small, build your empowerment, and you can do it!

How did I do it? Lemme show you how!

How to Paint a Bathroom Ceiling | www.rappsodyinrooms.com

How to Paint a Bathroom Ceiling

  • Clear out the bathroom so you don’t get paint droplets on anything. Thankfully it is generally easy to wipe down drips off counters, sinks, and floors so those can stay.
  • Clean the ceiling. Just give it a nice wipe down so you don’t paint dust into the ceiling. That’s a big yuck-o.
  • Gather your supplies. I needed a step ladder, drop cloth, paint tray, metal paint can opener, short handled angled brush, roller, and I used Behr Flat Interior Ceiling Paint in the white from the can.

How to Paint a Bathroom Ceiling | www.rappsodyinrooms.com

  • Cut in. I used a short handled angled brush. You can also use an edger.

How to Paint a Bathroom Ceiling | www.rappsodyinrooms.com

How to Paint a Bathroom Ceiling | www.rappsodyinrooms.com

  • Roll with the appropriate nap.

How to Paint a Bathroom Ceiling | www.rappsodyinrooms.com

  • I always make sure to give it two coats. Since I hate prep work my biggest nightmare would be to take a shortcut on the painting, put everything bank in the room, stand back to look at my work and see streaky paint that could have been avoided with just one more coat. So I always do two coats.

There you go! Painting a bathroom ceiling complete! On to the rest (eventually)…

How to Paint a Bathroom Ceiling | www.rappsodyinrooms.com


Are there any projects that you were this close to calling in the pros to do and then found it within yourself to do? I’d love to hear about your own empowerment story!

Click here to watch a video on how to paint a bathroom ceiling!

  • I know you were thrilled to finish this in only one afternoon. You are a neat painter; I never would have been able to do this without taping the walls.

    I’m looking forward to seeing what else you do in this room.ReplyCancel

    • I was SO thrilled Paula! Hopefully now I can get moving on the other ceilings. But first, lots of painting for this room!ReplyCancel

  • i need to paint my ceiling in my kitchen and dining room and i am putting it off big time. UGH. now that you are a pro maybe you want to do it? 😉ReplyCancel

    • Haha! Well, I’m not sure I’m a pro! And by the time I paint all the ceilings in my house I may never lift a paint brush again. But I can be your cheerleader! You can do it!!!!!!! We could do a blogger ceiling paint challenge! Hah! (But I’m kind of serious…it’s all about motivation!)ReplyCancel

  • nancy

    A few of things. First: Good job. I’ve been painting rooms for years and years and when it comes to the bathroom, if the shower or bath is used frequently, the ceiling and walls should always be given a good scrub with TSP and then a good rinse. Also, if it is used frequently..wouldn’t an eggshell sheen be a better paint to use. If it’s the guest bath, no shower or steam activity, then flat sheen is OK.

    Love your blog..keep those projects coming.ReplyCancel

    • Thanks so much for the comment and great ideas! I’ve never used TSP. I will look into it. Thanks! I also didn’t know that the sheen mattered based for the humidity level. I’ll also look into that! Thanks for all the suggestions!ReplyCancel