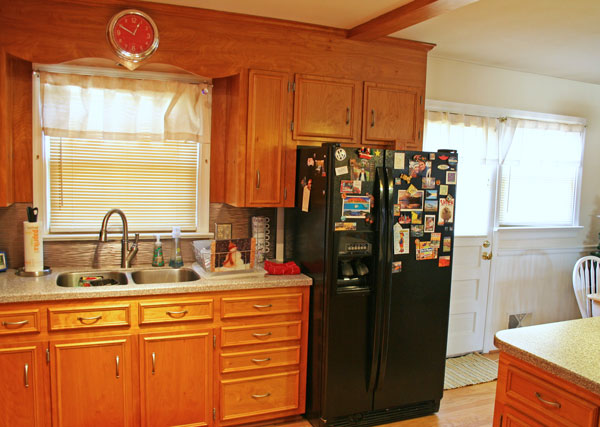
For years we lived behind old, yellowed, cracking plastic slatted blinds. They were in rough shape to say the least. Heck, half of them couldn’t even open. [My apologies to all of our guests with that one wonky shade that couldn’t open. We feel ya, our bathroom one was the same.]
Picking the right shades for your home and a review of cellular shades (with great insider tips and tricks) | www.rappsodyinrooms.com

We decided to have our house grow up a little bit in the blinds area. Instead of just replacing some of the very broken ones, we decided to replace them all (except the mini-blind Roman Shades in the Mego Cave). However, narrowing in on the type of blinds we were going to buy took some time. After much consideration we narrowed it down to cellular shades and faux wooden blinds (the wide plank ones).

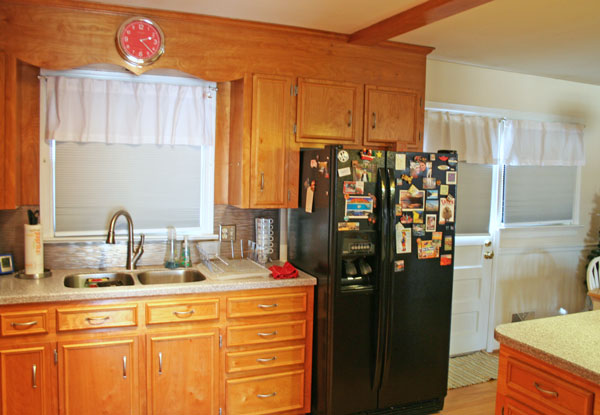
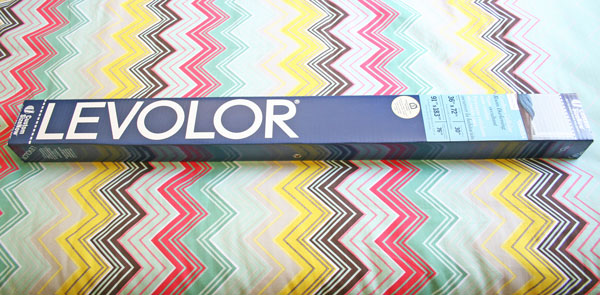
To further help our decision making I would inspect everyone’s shades in their house when I visited. I would go up to them, feel them, peer at them, and then I would ask lots of questions as to their durability, aesthetics, cleanliness, etc. I was kind of obnoxious in my research I now realize. After months (yes, months!) of waffling we decided to make a decision: cellular shades it was! To be specific, we picked Levolor Cellular Blackout Shades in Snow from Lowe’s.
Picking the right shades for your home and a review of cellular shades (with great insider tips and tricks) | www.rappsodyinrooms.com

Picking the right shades for your home and a review of cellular shades (with great insider tips and tricks) | www.rappsodyinrooms.com

Picking the right shades for your home and a review of cellular shades (with great insider tips and tricks) | www.rappsodyinrooms.com

I thought it might be helpful to give you the dish on these shades in case you ever find yourself in the same situation. It sure would have helped me (I googled the heck out of cellular shades and faux wood blind shades to find any opinions on them).

Picking the right shades for your home and a review of cellular shades (with great insider tips and tricks) | www.rappsodyinrooms.com

Pros:

  • Blackout shades: You have never had a good night’s sleep until you’ve slept with blackout shades. As a self-proclaimed light sleeper I have been getting long zzz’s with these. They are awesome!
  • Self-Cleaning (or no clean): Because of how you lift them up and down they basically self-clean. Dust doesn’t have as much space to settle on and if it does it basically bounces off when you put them up and down.
  • The Look: I love how these look! They create a nice white look when down with their classy accordion folding but basically disappear when up.
  • Energy Efficient: This was really the factor that pushed us over the edge on these. If we were going to spend a good amount of money on these shades they might as well work for us too! It is amazing how they trap hot or cool air (depending on the season) in their cell pockets. When you open them you can feel the temperature difference between the front of the shade and behind it.
  • Cordless: Cords no more! Goodbye messy strings everywhere.

Picking the right shades for your home and a review of cellular shades (with great insider tips and tricks) | www.rappsodyinrooms.com

Cons:

  • Blackout shades: Yes, I meant to put this on both lists. At first I was a little leery when I put up the first batch of shades (we bought one room at a time each pay check to help lessen the blow) our room was DARK when I put them down. Accustomed to having sunlight shine through even the shades I got worried. Then I realized I only keep shades down at night so why does it even matter? But for those of you with close neighbors or in the habit of keeping shades down during the day you can buy ones that are not blackout. There are options for whatever your preference.
  • Cordless: I guess it is good that most everything on the con list is also on the pro list. That means there really aren’t that many real cons, right?! I like the cordless but it does require standing on the sofa to put up our bay window shades. Oh well, all the rest of them I can reach. However, we are a tall household so that may be an issue for those shorter individuals.
  • A Little Tricky: These shades are a little tricky in putting up and down. Meaning, to put them up you have to press a button. When pulling down you don’t press the button. If you press the button pulling them down you can mess up the internal cording. For us, we’ve got it down but we do have to relay instructions to guests. I’m actually thinking about labeling the blinds discreetly so guests don’t have to really remember when to press the button or not – they can just read and follow the instructions.

Picking the right shades for your home and a review of cellular shades (with great insider tips and tricks) | www.rappsodyinrooms.com

Installation Tricks

Installing is easy – once you get the trick of it. The first three windows probably took me almost two hours to do. Then each window after that probably took 5-10 minutes. Really, the hardest part was getting down the ancient shades (so many stripped screws from the former owners).

The directions take you step-by-step. What I found easiest was doing each step on all the windows. So take all the shades down at once. Then mark where you need to drill by using the brackets they give you (I lost my first drill bit in the wall on this one). Then drill your holes and finally screw in your brackets. Pop in your shades and you’re done.

Picking the right shades for your home and a review of cellular shades (with great insider tips and tricks) | www.rappsodyinrooms.com

Things I Learned About Cellular Shades

  • There is a neat machine that cuts the shades to size. The person will input the window measurements into the computer. However, at this step tell them (if they are inside mount) say the window is 1/8th of an inch larger than it really is. This will give you the tightest fit in the window – in a very good way.
  • Make sure to open these boxes outside. There is lots of dust after they have been cut.
  • Before you install the shades run your fingernail up and down the edges of the shades to try and break them up a little bit. When the machine cuts them sometimes they can melt together a little bit. This somewhat breaks up the melting. However, when you pull down the shades for the first time do it very slowly. You will have to carefully separate a few of the cells with your fingers. But once they are separated you are good to go from then-on!

Picking the right shades for your home and a review of cellular shades (with great insider tips and tricks) | www.rappsodyinrooms.com

In summary I HIGHLY recommend getting cellular shades. I love them more every day! One of the best investments we’ve made in the house to date.

Phew, that’s a lot of words for shades in a house! Hopefully if you are on the hunt for new shades or thinking about changing out shades this will be a helpful post for you. The before and after pictures aren’t that stunning (but in person it is much more dramatic of a change) but it definitely is a whole house changer for this family.

Is it weird that I feel like a real grown-up now that I have (what I call) grown-shades?

  • Frances

    Thanks for the write up.
    Are you still enjoying your cellular shades.
    I am going through the same process of trying decide what type of blinds to purchase.
    So dust has not been a problem?
    What about dead insects getting trapped in the cells?ReplyCancel

    • I love them!! I definitely recommend them. Dust has not been a problem and I haven’t noticed dead insects in them…but I also never looked for them either! Haha. Good thought though. If it happens they easily pop out and you can just dump those bugs!ReplyCancel

  • Frances

    Thanks for letting me know that you still recommend them. If I have anymore questions, would it be ok to contact you?ReplyCancel

  • Barbara

    My walls are beige colored and window trim is white. White or beige blinds?ReplyCancel

    • My vote is white, to match the window trim. I think they will look seamless that way. Plus, you never know what color of the walls will be later – those change more than trim!ReplyCancel

  • Thanks to sharing very useful information nice article.ReplyCancel

  • They are readily available in the market, easily installed and are definitely easy to manipulate. Even if they are exposed to direct sunlight for long hours, you rest assured that they are durable enough to last a long time. Moreover, you can use Honeycomb Blinds Caroline Springs to totally block out the sun if you so desire.ReplyCancel

  • Double or single cell? What does options 1/2, 3/8, mean?ReplyCancel

    • I got the single cell. The 1/2, 3/8 are size options. Hope this helps!ReplyCancel

Happy Monday everyone! I hope you all had a wonderful weekend! Mine was glorious with Goldilocks weather, a little clothes shopping, and some outdoor fun. I call it a win!

Last week I shared my bookshelf styling makeover with mementos in our guest room (getting it ready for a visit from family soon!). You saw the foam board bookshelf topper that I made, and I wanted to share with you how I made it. It was so easy and made from things that I had in the house already (part of my challenge to myself in redoing the bookshelf).

Let’s remind ourselves what the final product looked like:

How to Make a Foam Board Bookshelf Topper | www.rappsodyinrooms.com

To get started I measured the length, width, and depth of the bookshelf top. Then I decided I wanted an inch lip all away around the bookshelf. I took these measurements and drew it all out on the foam board.

How to Make a Foam Board Bookshelf Topper | www.rappsodyinrooms.com

Then I cut the large piece of foam board and scored the lines I drew for the lip. The great thing about using foam board is that you can cut it half way and still have a layer of paper holding the whole piece together. That piece of paper also allows the board to bend and provide that lip.

Dry fit it to make sure your measurements were correct.

How to Make a Foam Board Bookshelf Topper | www.rappsodyinrooms.com

Then find a pretty fabric and wrap it around the foam board. Use your handy-dandy duct tape to tape it underneath. Duct tape really does wonders, doesn’t it?

How to Make a Foam Board Bookshelf Topper | www.rappsodyinrooms.com

Pop it on your bookcase and you’re done (except for styling)!

Styling a Bookcase with Memories and Mementos | www.rappsodyinrooms.com

Styling a Bookcase with Memories and Mementos | www.rappsodyinrooms.com

Styling a Bookcase with Memories and Mementos | www.rappsodyinrooms.com

It’s such a fun pop of pattern and color to the bookshelf! It is also a little luxurious because it is velour. I like to walk into the room and rub it. Maybe it’s like my lucky Buddha except it’s my lucky fabric?

Post Shared Here:

  • I like the thickness and texture that your topper gives to your shelf. Using the fabric adds interest and makes your accessories pop.ReplyCancel

    • Thank you Paula! I was trying to give it a classier look for a cheaper bookcase.ReplyCancel

I am having so much fun creating the most inviting, bright, happy guest room I can! The changes with the curtains, fabric gallery wall, and headboard just make me want to do a happy dance. Or just spend lots more time lounging in the guest room. Or at most it makes a nice happy spot to get dressed every day since my clothes are kept in this closet. Or most importantly, host happy guests who make the room even brighter!

I decided to keep the momentum for this room and turn to the bookshelf that not only welcomes you into the guest room but also into the hall. This is the straight view you get when you start down the hallway.

Styling a Bookcase with Memories and Mementos | www.rappsodyinrooms.com

This is a bargain Target bookshelf but I love it. It is spacious, a nice white, and just the right size for this little nook (a happy surprise – we bought it for another space and then it found its way here).

However, the shelves themselves were not all that happy. They were just lined with books. Practical, yes, but particularly appealing? No.

Styling a Bookcase with Memories and Mementos | www.rappsodyinrooms.com

To make this project even more fun, I challenged myself to make it a no spend project. That means everything that you see in the bookcase was already in the house. I love these types of challenges. I feel they can really force you to be more creative and think outside the box.

The result of this challenge to my creativity is what I call a foam board bookshelf topper. Inspired by the foam board cornice for our living room, I took it to the bookshelf. I’ll be sharing that tutorial with you later this week. For today I want to focus on the no spend styling challenge for the bookcase. But I couldn’t help gush a little bit about that sassy little velour topper, right?

Styling a Bookcase with Memories and Mementos | www.rappsodyinrooms.com

Of course my process always starts with chaos. Most projects start there, don’t they? The important thing is that you don’t end with chaos (definitely possible with styling projects).

To start styling I first started sorting the books. I took the pretty books or the ones I reach for a lot and put them in a pile. I then sorted out ones I didn’t mind sending to the basement bookcase. Then I started layering the books in – some vertical, some horizontal, trying to create a balanced look.

Styling a Bookcase with Memories and Mementos | www.rappsodyinrooms.com

Then came the knick knacks.

Styling a Bookcase with Memories and Mementos | www.rappsodyinrooms.com

I tried to keep the rule of threes in mind and also have a nice mix of sizes, shapes, and heights. I think heights are what add the most interest to styling. You need to lead your eye around a space. Height can really help you accomplish that.

Styling a Bookcase with Memories and Mementos | www.rappsodyinrooms.com

Some of you may question why I didn’t cover the back of the bookcase with paper or paint it a bright color. I thought about it but at the end of the day I thought it would just be too busy. So for now I decided to use the sassy foam topper with the velour fabric and keep the white bookcase white so the objects can be the fun pops of color.

Styling a Bookcase with Memories and Mementos | www.rappsodyinrooms.com

I also love to use items that have meaning to me in styling. I love items that have a memory attached to them. They are more fun for me to look at every day compared to items bought from a magazine. Don’t get me wrong, I LOVE items from magazines but they need to be in the mix of other much-loved items.

Here are some of the memories in the bookcase disguised as pretty styling pieces.

Styling a Bookcase with Memories and Mementos | www.rappsodyinrooms.com

  • The wooden tray is from a project done at my first Haven conference.
  • The bee’s wax candle was a present from my mom on one of her trips here. It is from a local store, and we had such fun talking with the owner of the store learning about bee’s wax (which is actually quite interesting).
  • This gorgeous yet delicate bowl in the tray was a wedding present from a very dear friend.

Styling a Bookcase with Memories and Mementos | www.rappsodyinrooms.com

  • This quirky little road runner number just spoke to me at an antique store in Staunton. Eric took me there for a little weekend getaway earlier this spring. I love anything with some quirk.
  • The sand is from our wedding. Oh man, I love every memory about that day.

Styling a Bookcase with Memories and Mementos | www.rappsodyinrooms.com

  • The container holding the books on the left is something my mother-in-law gave to me from her décor she got while living in Japan.
  • This vase is another memory of shopping with my mom. Also a present from her.
  • Oh the Candy box. What an AMAZING memory to have of my grandparents who have passed on. After they passed my dad found this box full of love letters from my grandpa to my grandpa when they just met when he was in the Army. Oh. my. gosh. Old love letters. People just don’t talk/write/express themselves that way anymore. It allowed me to see more of who my grandparents are and to feel closer to them than I ever have before.

Styling a Bookcase with Memories and Mementos | www.rappsodyinrooms.com

  • These beautiful blue and green glass ornaments were a gift from my oh-so thoughtful mother-in-law who knows my favorite colors and love of all things glass. I also might have oohed and ahhed over some she has. I’m not so subtle I guess.
  • The Bubble Room napkins were so pretty I had to snatch them up when Eric and I visited his parents when they lived in Florida. This is one of the best restaurants I have ever eaten at. I don’t know if that is because of the food or the amazingly, delicious, gigantic, yummy pieces of cake they serve as dessert.
  • On top of the color wheel (still love that colorful chunk of wood) is a beautiful monkey bowl my mom bought for Eric. She thought of him because he loves monkeys, it is a drawing done in a Japan (just put on a bowl), and we are going there this year.

Isn’t it wonderful that not only can we surround ourselves with beautiful items but these items can also remind us of beautiful moments in life. And as I’ve said before, I need more reminders in my life to just savor the moments of every day.

Do you have any special items that you decorate with that are not only beautiful but share a special place in your heart?

Styling a Bookcase with Memories and Mementos | www.rappsodyinrooms.com

  • I love the way you styled your bookcase and especially loved the stories behind your things. I’d love to read some of your old letters that your grandparents wrote. I’ll bet that they are interesting and full of history. When are you going to Japan? I can’t imagine taking a trip like that!ReplyCancel

    • Thank you Paula! My dad has the letters but I should copy them next time I see him. They are amazing! We are going to Japan in the fall! The planning is definitely starting to happen now! Exciting!ReplyCancel

Oh the evolution of a room. Layer by layer each room is built into something that is beautiful, emotional, and telling about you. It’s fun to have a room slowly grow with you. It can mirror where you are in your life, how you feel, and how you use your home at a certain time in your life. Make sure you create rooms that look and feel like you – not like some magazine you are trying to emulate. If you slowly evolve a room, piece by carefully chosen piece, people will feel the thoughtfulness and personality shining from your home – plus it will be the epitome of a sanctuary to you. Now doesn’t that sound like a happy place to live?

Today’s post continues with the evolution of our guest room. What once started out as a brown room without much character is on its way to looking beautiful and sassy – meaning it has a whole lot of character now! But to really appreciate it’s update, let’s look at in it’s brown state.www.rappsodyinrooms.com  I showed you my latest creation of a fabric gallery wall (that still makes me stop and stare and sigh with happiness every time I see it) and the next element that really needed to happen in the room was a coordinating headboard. This headboard still had its velour fabric that matched the brown bear of a room. With everything else getting brightened up this was like a dark hole in the room. Boo brown!How to Make a Fabric Gallery Wall | www.rappsodyinrooms.comThankfully my mom and I were really tuned into fabric when she visited, and we were able to find this gorgeous white textured fabric at the Charlottesville U-Fab.How to Make an Upholstered Headboard | www.rappsodyinrooms.comWe already  have a wonderful headboard that Eric built pre-blog, but since I had to strip it down to recover it, I can show you how he built it.How to Make an Upholstered Headboard | www.rappsodyinrooms.com

Materials:

  • Particle Board
  •  1 x 4’s
  • 2×4’s
  • Wood screws
  • Nuts, bolt, and washers to attach to bed

Instructions:

1. Cut the particle board a couple inches wider than your bed. To find your height measure from the bottom of your mattress to the top of where you want the headboard to end. Cut that height into the particle board. 2. Use the 1×4’s and 2×4’s to frame out your headboard. Cut two tall outside pieces from the 2×4’s that go from the floor to the top of the headboard. Then cut two smaller pieces from the 1×4’s to connect the 2x4s. 3. Screw them all together.How to Make an Upholstered Headboard | www.rappsodyinrooms.com4. Cover with batting and fabric. I like to staple the batting to the headboard and separately staple the fabric to the headboard. Then you can easily change out the fabric without removing the batting.How to Make an Upholstered Headboard | www.rappsodyinrooms.com5. Screw holes in the bottom of the legs and use large nuts, bolts, and washers to attach the legs to the bed frame.How to Make an Upholstered Headboard | www.rappsodyinrooms.comNow bring on those pretty pictures showing how this reupholstered headboard really brings a new lightness and vitality to the room! I am loving playing with the textures and white on white patterns in this room so that they don’t compete with the duvet.How to Make an Upholstered Headboard | www.rappsodyinrooms.comHow to Make an Upholstered Headboard | www.rappsodyinrooms.comHow to Make an Upholstered Headboard | www.rappsodyinrooms.comHow to Make an Upholstered Headboard | www.rappsodyinrooms.comHow to Make an Upholstered Headboard | www.rappsodyinrooms.comI think this room really shows our guests about ourselves and how we want them to feel when they visit: comfortable, bright, happy, relaxed. But why don’t you…be our guest, be our guest, put our service to the test!

  • Love the textured fabric in white that you used for your headboard. It’s the finishing touch that your room needed for guests!ReplyCancel

    • Thanks Paula! I love how textures can add so much to a room without it being too in your face.ReplyCancel

  • Katie

    As a girl who loves patterns, I love how you have been able to mix patterns and textures in this room without it looking busy. The tone-on-tone patterns in your white curtains and headboard are great! I’ve definitely been struggling with how to mix prints without them competing with each other so I’m going to start shopping for more “textured” rather than “printed” fabrics so I can create a beautiful guest room too!ReplyCancel

    • Amen to the pattern loving! I want all patterns, all the time. Unfortunately that doesn’t work so I have definitely grown to love and appreciate the depth that texture adds to a space. Can’t wait to see how it comes together in your guest room!ReplyCancel

Whenever I go to a fabric store I feel like I want to buy a yard of every beautiful fabric that catches my eye (hint: that’s a lot). Not being an avid sewer (or quilter), I usually have no use for buying them (a girl can only get away with so many pillows in the house…says my husband).

However, when thrift store shopping with my mom on her annual visit we came upon a designer’s collection of sample fabrics. They were the gorgeous, expensive fabric samples used for high-end clients; you could tell. There were so many beautiful ones we spent at least an hour digging through them and putting together a collection of our favorites.

These favorites are now beautifully displayed in my home in the form of a gallery wall. Hurray! I finally have an excuse to buy all the beautiful fabric I love. I can easily switch out fabrics on the wall, keeping the gallery fresh and satisfying my fabric buying urge (plus, I only need a little but so I don’t have to buy much fabric). Win!

How to Make a Fabric Gallery Wall | www.rappsodyinrooms.comHow to Make a Fabric Gallery Wall | www.rappsodyinrooms.com

The gallery walls ended up flanking the guest bed.

How to Make a Fabric Gallery Wall | www.rappsodyinrooms.com

With the crazy patterned duvet cover, I have been trying to keep things sort of tame throughout the rest of the room – like my white chevron curtains. However, with the duvet being the focal point for an otherwise pretty neutral room, that’s the only place my eye landed when looking at the room. I needed to make my eyes travel throughout the room. That meant bringing focus up the wall. Hence the solution of flanking gallery walls!

I first combed through the house finding all the old frames I had that weren’t in use (it was surprisingly a lot).

How to Make a Fabric Gallery Wall | www.rappsodyinrooms.com

To fill in the rest of the space I went to the dollar store and bought the rest. I focused more on shapes and size, not color, because I knew I was going to spray paint them all a nice, glittery silver.

How to Make a Fabric Gallery Wall | www.rappsodyinrooms.com


After they were all painted and gorgeous, I began working on the layout. I knew I wanted to balance the two sides of the wall, so I decided to try to keep an equal number of frames with equivalent sizes.


After I hit upon something I liked on the bed, I transferred it to the wall using a paper cutout of the frame. This allowed me to get a better visual and play around a bit more without committing a million holes to the wall.


How to Make a Fabric Gallery Wall | www.rappsodyinrooms.com

Finally I got my galleries right. Now knowing where my frames were going to go, I needed to put in the fabric. I wanted to wait until I had the frame arrangement so I could make sure the fabrics looked good in their position on the wall too.

How to Make a Fabric Gallery Wall | www.rappsodyinrooms.com

I started with the bolder pops of color. Since I went a bit neutral on most of the fabrics (again, that duvet is crazy) I wanted to make sure I had pops of color on both sides of the wall. I picked those out and placed them first. Then I just played around with the other ones until I hit upon something I liked.

I then traced the glass of the frame onto the back of the fabric and cut out the fabric. Then into the frame they went!

To hang them on the wall I just took down one placeholder paper on the wall, starting at the bottom of the gallery wall. I would then hold up the frame in the position I liked and make a small pencil line at the top middle. Then I would measure from the top of the frame to the top of the nail holder. I would mark that measurement to the wall and put a nail in it. This was a really easy way to get the wall exactly how I wanted it to look. I think there was only one time I had to do two holes for a picture. One mess up in hanging pictures is HUGE for me. If you take off some of my pictures from the wall it can be quite the embarrassing amount of holes.

How to Make a Fabric Gallery Wall | www.rappsodyinrooms.com

How to Make a Fabric Gallery Wall | www.rappsodyinrooms.com

How to Make a Fabric Gallery Wall | www.rappsodyinrooms.com

After this was finished, I was thrilled with the result! First, I didn’t have a gallery wall in the house yet and I have been itching to do one. Secondly, this is exactly how I envisioned these walls coming together.

How to Make a Fabric Gallery Wall | www.rappsodyinrooms.com

How to Make a Fabric Gallery Wall | www.rappsodyinrooms.comHow to Make a Fabric Gallery Wall | www.rappsodyinrooms.com

I LOVE them! I love the fabrics, the different frame shapes, and the texture. I also love how it can change with however I am feeling. If I get tired of fabric, photographs or artwork can easily be switched in and out.

  • Love it! Like you, I always admire gorgeous fabric when I’m out but have no practical use for buying any of it. My mother-in-law is a fantastic quilter, but I can only beg her to complete so many projects for me! I love this idea and think your results are fab.ReplyCancel

    • Thank you so much Meg! It sounds like your MIL is so talented! I hope you can beg a few projects out of her! If not, frame those beautiful fabric squares!ReplyCancel

  • Your gallery wall adds a lot of interest to your guest bedroom walls and it’s a great way to use those pretty samples. Did you get them downtown?ReplyCancel

    • Thanks Paula! I did get them downtown at Moyanne’s estate store. It was nice to finally find a reason to buy some of her gorgeous fabric samples!ReplyCancel

  • Samantha Clayton

    Your house makes me happy! I love your guest bedroom – especially the bedside tables. This encourages me to do more with our house. 🙂ReplyCancel

    • Thanks Samantha! It makes me happy to hear that! I always want people to feel happy when they come to our house. Those bedside tables were such a fun find too. I got them at a thrift store for $11 each and painted them. From the pictures I see on Facebook it looks like you are doing LOTS with your house!ReplyCancel

  • Kris

    Love the room? Where did you get your curtains and rods? I love how simple and pretty they are.

    The room is beautiful!ReplyCancel